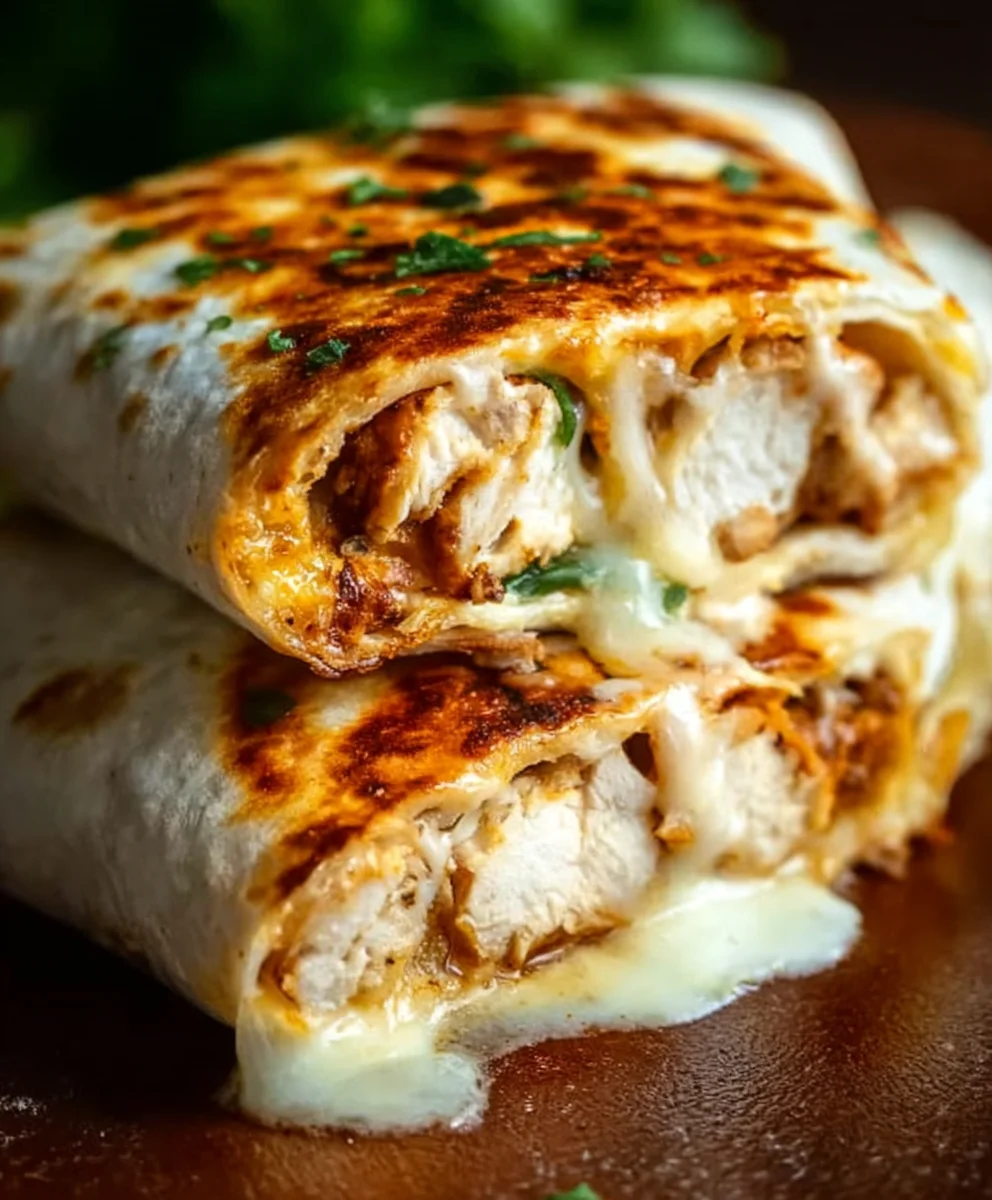
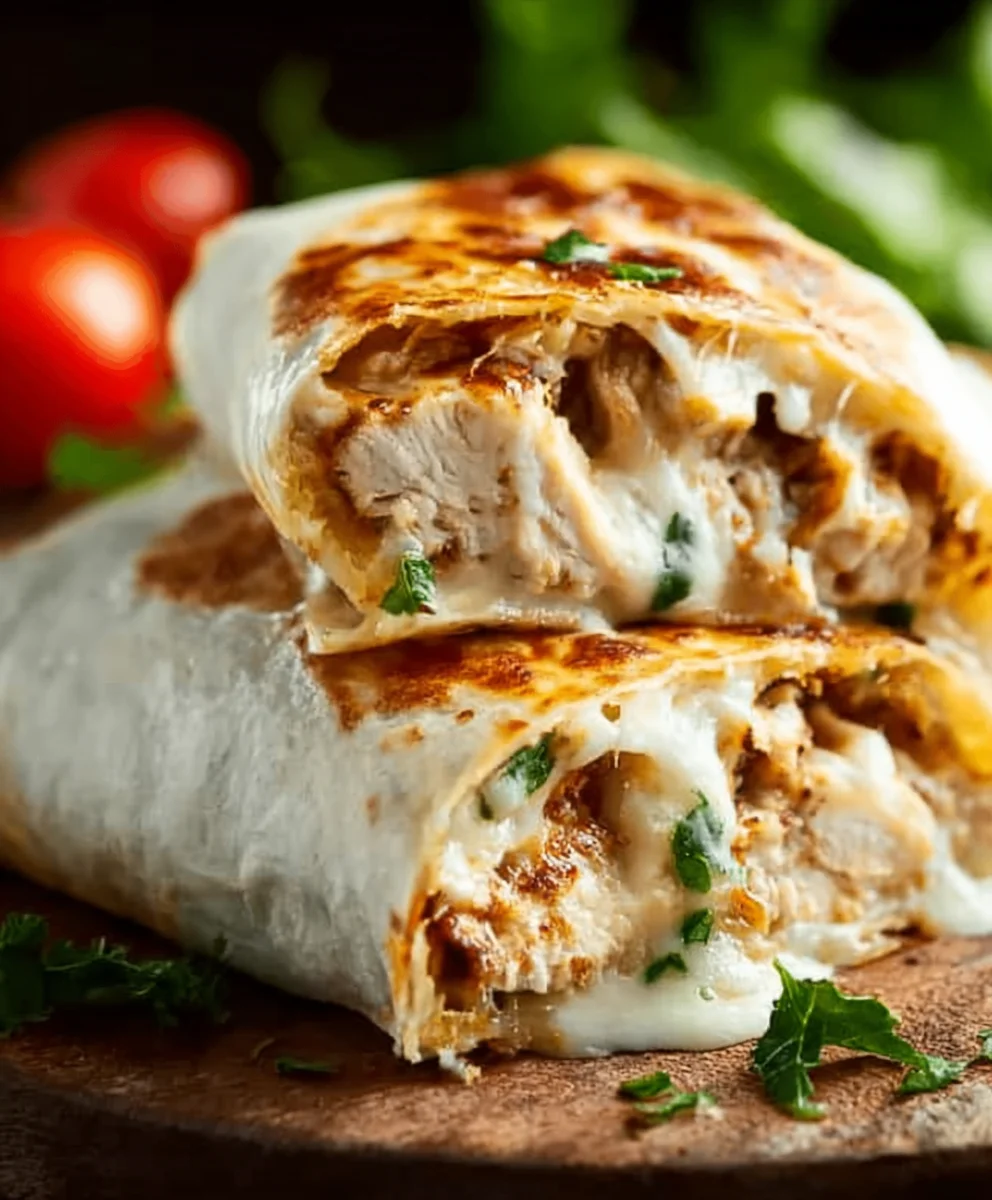
Cheesy Garlic Chicken Wraps – Easy & Delicious
Cheesy Garlic Chicken Wraps are more than just a meal; they’re a hug in a tortilla, a guaranteed crowd-pleaser, and an absolute weeknight lifesaver. Why do we adore these incredible creations? It’s the irresistible symphony of flavors and textures: tender, juicy chicken infused with the non-intoxicating aroma of garlic, all enveloped in a melty blanket of cheese, then nestled within a soft, warm tortilla. This isn’t your average wrap; it’s a culinary adventure that transforms simple ingredients into something truly special. The magic lies in the perfect balance – savory, creamy, garlicky goodness that makes every bite an explosion of pure comfort. Prepare to impress yourself and anyone lucky enough to share these phenomenal Cheesy Garlic Chicken Wraps with you; they’re destined to become a staple in your recipe repertoire.
Why You’ll Love This Recipe
Simple Steps, Spectacular Results
Ingredients:
- 2 cups cooked chicken, shredded
- 1/2 cup garlic aioli
- 1 cup cheddar cheese, shredded
- 4 large tortillas
- Salt and pepper to taste
Preparing the Cheesy Garlic Chicken Filling
Step 1: Combine the Chicken and Aioli
First, in a medium-sized mixing bowl, we’ll combine our shredded cooked chicken with the luscious garlic aioli. This is where the magic starts to happen, infusing every strand of chicken with that irresistible garlic flavor. Make sure your chicken is completely cooled before you start. If you’re using leftover roasted chicken or rotisserie chicken, this is the perfect way to give it a new life. Gently shred the chicken into bite-sized pieces if it isn’t already. Then, add the entire 1/2 cup of garlic aioli to the bowl. Use a spoon or a rubber spatula to thoroughly mix the aioli into the chicken, ensuring that every piece is well-coated. You want a creamy, cohesive mixture that’s easy to work with. Don’t be shy with the mixing; get into all the nooks and crannies of the shredded chicken.
Step 2: Seasoning for Flavor Perfection
Now that our chicken is beautifully coated in garlic aioli, it’s time to season it. This step is crucial for enhancing the overall flavor profile of our Cheesy Garlic Chicken Wraps. We’ll start by adding salt and freshly ground black pepper to taste. The exact amount will depend on your personal preference and how salty your aioli or chicken might already be. I usually start with about 1/4 teaspoon of salt and 1/8 teaspoon of pepper, then taste and adjust from there. Remember, you can always add more seasoning, but you can’t take it away, so it’s better to be conservative at first. Stir the salt and pepper in thoroughly, making sure they are evenly distributed throughout the chicken mixture. This ensures every bite will be perfectly seasoned.
Step 3: Incorporating the Cheesy Goodness
The star of the show, besides the garlic chicken, is the cheese! We’ll now add our 1 cup of shredded cheddar cheese to the chicken and aioli mixture. Cheddar cheese melts beautifully and provides that classic, comforting cheesy flavor that complements the garlic so well. Pour the shredded cheddar cheese directly into the bowl with the seasoned chicken. Use your spoon or spatula again to gently fold and mix the cheese into the chicken. We don’t want to overmix here; we’re just aiming to distribute the cheese evenly. Some of the cheese will start to melt slightly from the residual warmth of the chicken, which is perfectly fine. This will help bind the filling together beautifully.
Step 4: Warming and Melding the Flavors (Optional but Recommended)
While you can certainly assemble the wraps with the filling as is, I highly recommend warming the filling slightly before assembling. This helps the flavors meld together even more, and it ensures the cheese is wonderfully gooey. You have a couple of options here. You can either transfer the filling to a microwave-safe dish and heat it in the microwave for about 30-60 seconds, or you can put it in a skillet over low heat and stir occasionally until it’s warmed through and the cheese is starting to melt. If you choose the skillet method, be careful not to cook the chicken further, just warm it. This gentle warming process will make the filling even more irresistible and easier to spread into the tortillas.
Assembling and Finishing the Cheesy Garlic Chicken Wraps
Step 5: Assembling the Wraps
Now for the fun part: assembling our delicious Cheesy Garlic Chicken Wraps! Lay one of the large tortillas flat on a clean surface. You can lightly warm your tortillas in a dry skillet or microwave for about 15-20 seconds each to make them more pliable and less likely to tear. Take a generous portion of the warmed chicken and cheese filling (about 1/4 of the total mixture) and spread it evenly across the center of the tortilla, leaving a small border around the edges. Don’t overfill, or it will be difficult to wrap. Fold in the sides of the tortilla first, then tightly roll it up from the bottom. Repeat this process with the remaining three tortillas and filling.
Step 6: Toasting for the Perfect Texture
To give our Cheesy Garlic Chicken Wraps that extra special touch and a delightful crispy exterior, we’ll give them a quick toast. Heat a large skillet or griddle over medium heat. You can add a tiny bit of butter or cooking spray to the skillet if you like, though it’s often not necessary. Carefully place the assembled wraps seam-side down in the hot skillet. Cook for about 2-3 minutes per side, or until the tortilla is golden brown and slightly crispy, and the cheese inside is completely melted and gooey. Keep an eye on them to prevent burning. Once they’re beautifully toasted on both sides, remove them from the skillet. You can slice them in half diagonally for a more appealing presentation if you wish.
Conclusion:
You’ve now unlocked the secret to creating delicious and satisfying Cheesy Garlic Chicken Wraps! This recipe is a true crowd-pleaser, perfect for a quick weeknight dinner, a fun lunch option, or even for entertaining guests. The combination of tender chicken, fragrant garlic, and gooey cheese, all wrapped up in a warm tortilla, is simply irresistible. Don’t be afraid to get creative; the beauty of these wraps lies in their adaptability.
For serving suggestions, consider a side of crispy sweet potato fries, a fresh garden salad with a light vinaigrette, or even some crunchy tortilla chips. These Cheesy Garlic Chicken Wraps are best enjoyed warm, straight from the pan or oven, allowing the cheese to be at its melty best.
Regarding variations, feel free to experiment! Add some sautéed bell peppers and onions for a fajita-inspired twist, or incorporate a pinch of red pepper flakes for a touch of heat. You could also swap out the cheddar cheese for Monterey Jack or a blend of your favorite cheeses. For a lighter option, consider using whole wheat tortillas or even large lettuce leaves as a wrap.
So go ahead, gather your ingredients, and dive into making these delightful Cheesy Garlic Chicken Wraps. We’re confident you’ll love the ease of preparation and the incredible flavor. Happy cooking!
FAQs:
Can I prepare the chicken filling ahead of time?
Yes, absolutely! You can cook the chicken mixture ahead of time and store it in an airtight container in the refrigerator for up to 2-3 days. When you’re ready to assemble, simply reheat the filling and proceed with wrapping.
What if I don’t have garlic powder?
No problem! If you don’t have garlic powder, you can easily substitute it with fresh minced garlic. For this recipe, you’d likely need about 2-3 cloves of fresh garlic, sautéed until fragrant before adding the chicken.
Are there any vegetarian alternatives?
For a vegetarian version of these Cheesy Garlic Chicken Wraps, you can substitute the chicken with seasoned and cooked black beans, crum extractbled firm tofu, or even a hearty mix of sautéed mushrooms and spinach. Ensure you season these alternatives well to complement the garlic and cheese flavors.
Cheesy Garlic Chicken Wraps – Easy & Delicious
Quick and flavorful wraps filled with shredded chicken, garlic aioli, and melted cheddar cheese, all encased in a toasted tortilla.
Ingredients
-
2 cups cooked chicken, shredded
-
1/2 cup garlic aioli
-
1 cup cheddar cheese, shredded
-
4 large tortillas
-
Salt to taste
-
Pepper to taste
Instructions
-
Step 1
Combine shredded cooked chicken with garlic aioli in a mixing bowl until well-coated. Ensure chicken is cooled and shredded into bite-sized pieces. -
Step 2
Season the chicken and aioli mixture with salt and pepper to taste. Start with 1/4 teaspoon salt and 1/8 teaspoon pepper, then adjust as needed, stirring thoroughly to distribute. -
Step 3
Gently fold in the shredded cheddar cheese into the seasoned chicken mixture, distributing it evenly. Avoid overmixing. -
Step 4
Optional but recommended: Warm the filling in a microwave for 30-60 seconds or in a skillet over low heat until cheese is beginning to melt. This helps flavors meld. -
Step 5
Warm tortillas slightly to make them pliable. Spread about 1/4 of the filling evenly in the center of each tortilla, leaving a border. Fold in the sides, then tightly roll up from the bottom. -
Step 6
Heat a skillet over medium heat. Place wraps seam-side down and cook for 2-3 minutes per side until golden brown and crispy, and cheese is melted.
Important Information
Nutrition Facts (Per Serving)
It is important to consider this information as approximate and not to use it as definitive health advice.
Allergy Information
Please check ingredients for potential allergens and consult a health professional if in doubt.