Easy Homemade Chicken Nuggets – Crispy & Delicious
CHICKEN NUGGETS, oh how we love them! These golden, crispy morsels are a universally adored comfort food, bringin extractg smiles to faces young and old. From quick weeknight dinners to satisfying after-school snacks, chicken nuggets are the undisputed cbeef hampions of simple, delicious satisfaction. But what if I told you that you could elevate these beloved favorites beyond the frozen aisle and create chicken nuggets that are not only tastier but also healthier and surprisingly easy to make at home? Forget the greasy fast-food versions; this recipe unlocks the secret to perfectly seasoned, wonderfully tender chicken nestled in a shatteringly crisp, golden-brown coating. This isn’t just another chicken nugget recipe; it’s your gateway to creating the ultimate homemade chicken nuggets that will have evergin extracte begging for seconds, proving that the best things in life, like truly amazing chicken nuggets, are often made with a little love and effort right in your own kitchen.
Ingredients:
- 300 g chicken breast, boneless and skinless
- 250 g chicken thighs, boneless and skinless
- 2 teaspoons salt (for seasoning the chicken mixture)
- 1 teaspoon sugar (enhances flavor and browning)
- 1/2 teaspoon MSG (optional, for umami boost)
- 2 teaspoons garlic powder (for the chicken mixture)
- 2 teaspoons onion powder (for the chicken mixture)
- 1 teaspoon paprika (adds a subtle smoky note and color)
- 2 teaspoons black pepper (freshly ground is best)
- 1 large egg, lightly beaten
- 1 cup all-purpose flour (for dredgin extractg)
- 1 cup cornflour (cornstarch) (gin extract dredging, creates a super crispy coating)
- 2 teaspoons garlic powder (for the flour mixture)
- 1 teaspoon onion powder (for the flour mixture)
- 1 tablespoon salt (for the flour mixture)
Preparing the Chicken for Nuggets
Step 1: Mince the Chicken
The first step to achieving tender and flavorful chicken nuggets is to properly prepare the chicken. For this recipe, we’ll be using a combination of chicken breast and thighs. The chicken breast provides a leaner base, while the chicken thighs add moisture and richness, ensuring your nuggets aren’t dry. You’ll want to dice both the chicken breast and thighs into small, manageable pieces. Then, using a food processor or a sharp knife, mince the chicken until it forms a coarse paste. Aim for a consistency that is not entirely smooth, as some texture is desirable in a good nugget. You don’t want it to be completely liquid, but rather finely chopped and somewhat cohesive. This mincing process helps bind the seasonings and creates a cohesive nugget when cooked.
Step 2: Seasoning the Chicken Mixture
Now it’s time to infuse our chicken paste with delicious flavor. In a medium bowl, combine the minced chicken with 2 teaspoons of salt, 1 teaspoon of sugar, 1/2 teaspoon of MSG (if using), 2 teaspoons of garlic powder, 2 teaspoons of onion powder, 1 teaspoon of paprika, and 2 teaspoons of black pepper. The sugar might seem unusual, but it helps with caramelization and browning, giving your nuggets a beautiful golden hue and a touch more depth of flavor. The MSG, if you choose to include it, is a fantastic flavor enhancer that amplifies the savory notes of the chicken without adding a distinct flavor of its own. Mix these seasonings thoroughly into the chicken mixture using your hands or a spoon. Ensure that all the spices are evenly distributed for consistent flavor in every bite.
Step 3: Binding the Mixture
To ensure our nuggets hold their shape and have a satisfying texture, we need to bind the seasoned chicken mixture. Crack the egg into the bowl with the seasoned chicken. Gently mix the egg into the chicken until it is well incorporated. The egg acts as a binder, helping to hold the minced chicken together. Avoid overmixing at this stage, as it can make the nuggets tough. You’re looking for a consistency where the mixture is slightly sticky and holds together when you press it between your fingers. This binding is crucial for forming the nugget shape in the next step.
Forming and Coating the Nuggets
Step 4: Shaping the Nuggets
With our chicken mixture prepared and bound, it’s time to form our nuggets. You can approach this in a few ways. The simplest is to use two spoons to scoop and shape the mixture into bite-sized nuggets. Alternatively, you can lightly wet your hands and roll small portions of the mixture into balls, then flatten them slightly, or use your hands to shape them into traditional nugget forms. Aim for uniform shapes and sizes so that they cook evenly. Place the formed nuggets onto a parchment-lined baking sheet as you work. Don’t worry if they are not perfectly uniform; a little rustic charm is part of the homemade appeal.
Step 5: Preparing the Coating Mixture
While our shaped nuggets are resting, let’s prepare the crispy coating. In a shallow dish or a wide bowl, combine 1 cup of all-purpose flour, 1 cup of cornflour (cornstarch), 2 teaspoons of garlic powder, 1 teaspoon of onion powder, and 1 tablespoon of salt. The cornflour is key here; it’s what gives homemade nuggets that irresistible extra crunch that rivals your favorite fast-food versions. Whisk these dry ingredients together until they are thoroughly combined. This coating mixture is where the magic of crispiness happens. Ensure the salt and seasonings are evenly dispersed throughout the flour and cornflour for maximum flavor.
Step 6: Coating the Nuggets
Now, let’s give our chicken nuggets their signature crunchy exterior. Take each shaped chicken nugget and dredge it generously in the prepared flour and cornflour mixture. Make sure each nugget is completely coated, pressing the flour mixture gently onto the surface to help it adhere. For an even thicker, crispier coating, you can dip the coated nugget back into the beaten egg (from step 3, if you have any left, or lightly whisk another egg) and then dredge it again in the flour mixture. This double-coating method creates an incredibly substantial and satisfying crunch. Shake off any excess flour. Place the fully coated nuggets back onto the parchment-lined baking sheet, ensuring they don’t touch each other, which can cause them to stick.
Cooking the Chicken Nuggets
Step 7: Frying the Nuggets
The best way to achieve truly golden and crispy chicken nuggets is by frying them. Heat about 2-3 inches of neutral oil, such as vegetable or canola oil, in a heavy-bottomed pot or deep fryer to 350°F (175°C). Carefully add the coated chicken nuggets to the hot oil in batches, being careful not to overcrowd the pot. Overcrowding will lower the oil temperature, resulting in greasy, soggy nuggets. Fry for 3-5 minutes per side, or until they are golden brown and cooked through. The internal temperature should reach 165°F (74°C). Use a slotted spoon or spider to remove the cooked nuggets from the oil and place them on a wire rack set over a baking sheet to drain any excess oil. This wire rack method allows air to circulate, maintaining their crispiness. Continue frying the remaining batches, ensuring the oil temperature returns to 350°F (175°C) between batches.
Step 8: Baking the Nuggets (Alternative Method)
If frying isn’t your preferred method, you can bake these chicken nuggets for a healthier option, though they will be less crispy than fried. Preheat your oven to 400°F (200°C) and line a baking sheet with parchment paper. Arrange the coated chicken nuggets on the prepared baking sheet, ensuring they are not touching. Lightly spray or brush the tops of the nuggets with cooking oil. Bake for 20-25 minutes, flipping them halfway through, until they are golden brown and cooked through. The internal temperature should reach 165°F (74°C). While baking won’t achieve the same level of crispness as frying, it still results in a delicious and satisfying homemade chicken nugget.
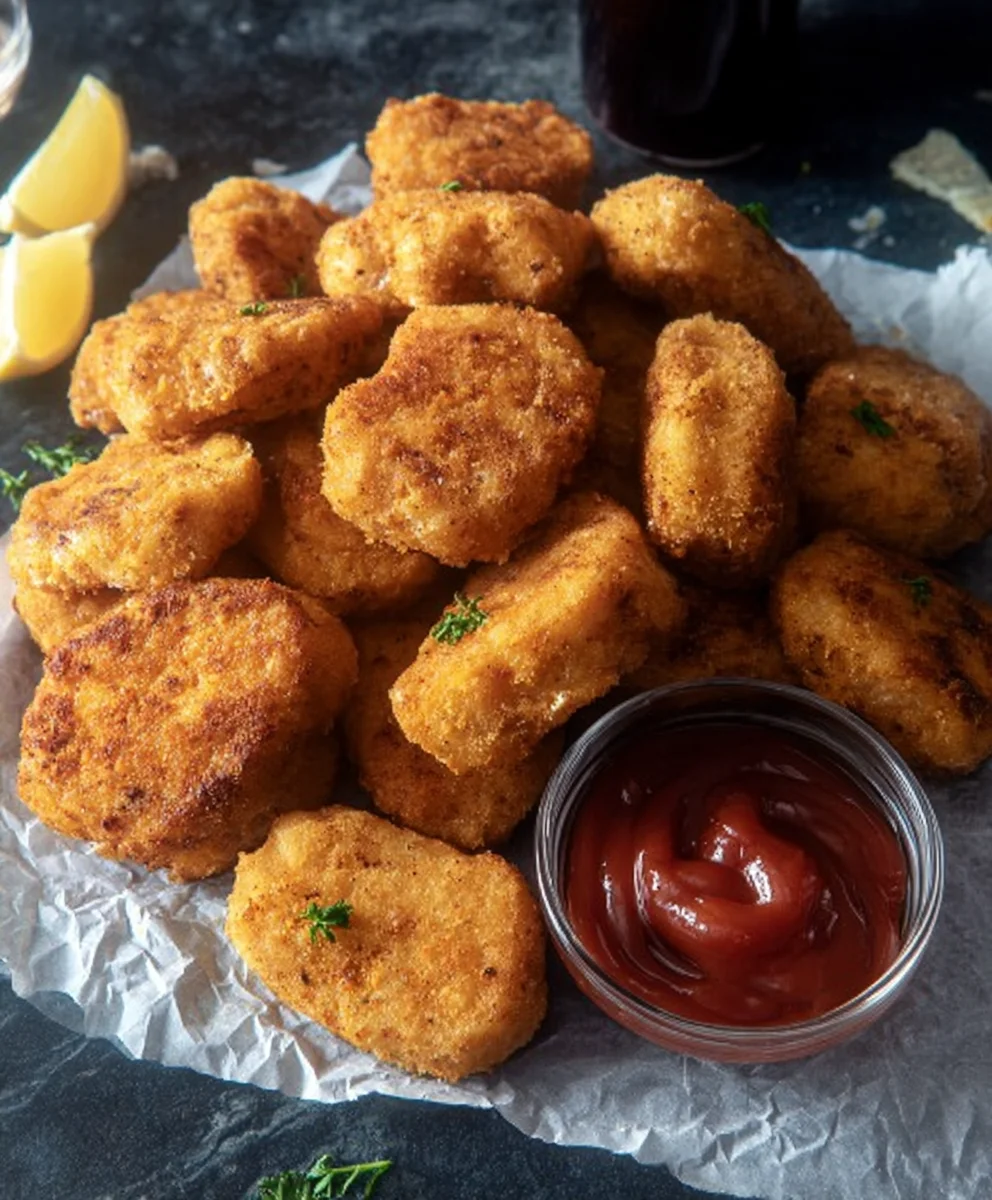
Step 9: Serving the Nuggets
Once your chicken nuggets are cooked to golden perfection, whether fried or baked, it’s time to serve them immediately. They are best enjoyed hot and fresh. Arrange them on a platter and serve with your favorite dipping sauces. Classic options include ketchup, mustard, BBQ sauce, honey mustard, or even a ranch dressing. The tender, flavorful interior combined with the incredibly crispy exterior makes these homemade chicken nuggets a guaranteed crowd-pleaser, perfect for a family meal or a fun snack.
Conclusion:
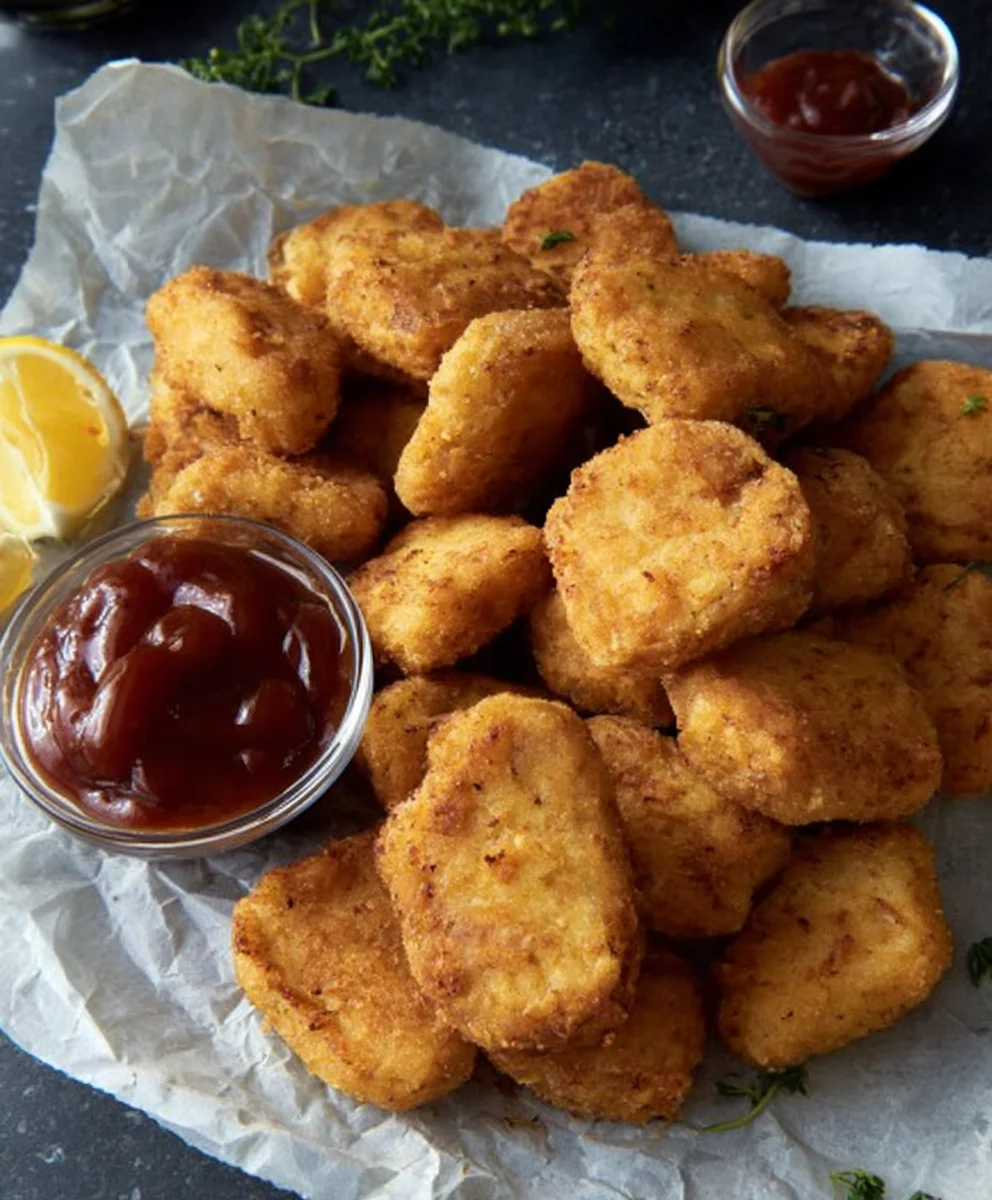
You’ve now mastered the art of making delicious, crispy CHICKEN NUGGETS right in your own kitchen! This recipe is designed to be straightforward, yielding golden-brown nuggets with a perfectly seasoned, juicy interior. We’ve gone through each step, from preparing the chicken to achieving that satisfying crunch in the final fry. These homemade CHICKEN NUGGETS are a fantastic alternative to store-bought versions, offering superior flavor and quality control. I hope you enjoy the process and, more importantly, the delightful results!
For serving, these CHICKEN NUGGETS are incredibly versatile. They are a crowd-pleaser as a main dish for kids and adults alike, perfect with your favorite dipping sauces like ketchup, barbecue, or honey mustard. They also make an excellent appetizer for parties or a fun addition to a lunchbox. Consider pairing them with crispy fries, a fresh salad, or even some steamed vegetables for a balanced meal. Don’t be afraid to get creative with your sides!
If you’re looking to switch things up, this recipe is highly adaptable. You can experiment with different spices in your breading mixture – paprika, garlic powder, or a pinch of cayenne for a little heat would be wonderful additions. For a healthier twist, try baking the nuggets instead of frying, or use panko breadcrum extractbs for an extra crispy texture. The possibilities are endless when it comes to customizing your perfect batch of CHICKEN NUGGETS.
FAQs:
Can I make these CHICKEN NUGGETS ahead of time?
Yes, you can prepare the uncooked CHICKEN NUGGETS and store them in the refrigerator for up to 24 hours before cooking. For longer storage, freeze them in a single layer on a baking sheet until solid, then transfer to an airtight container or freezer bag for up to 3 months. Cook from frozen, adding a few extra minutes to the cooking time.
What’s the best way to ensure my CHICKEN NUGGETS are crispy?
To achieve ultimate crispiness, ensure your oil is at the correct temperature (around 350°F or 175°C) and avoid overcrowding the pan, as this can lower the oil temperature and lead to soggy nuggets. Double-frying can also enhance crispiness; fry them once until lightly golden, remove to a wire rack, and then fry again briefly until deeply golden brown and fully cooked.
Easy Homemade Chicken Nuggets – Crispy & Delicious
Create incredibly crispy and delicious homemade chicken nuggets that are a guaranteed crowd-pleaser. Perfect for a family meal or a fun snack, these nuggets are easy to make and taste amazing with your favorite dipping sauces.
Ingredients
-
300 g chicken breast, boneless and skinless
-
250 g chicken thighs, boneless and skinless
-
2 teaspoons salt
-
1 teaspoon sugar
-
1/2 teaspoon MSG (optional)
-
2 teaspoons garlic powder
-
2 teaspoons onion powder
-
1 teaspoon paprika
-
2 teaspoons black pepper
-
1 large egg, lightly beaten
-
1 cup all-purpose flour
-
1 cup cornflour (cornstarch)
-
2 teaspoons garlic powder
-
1 teaspoon onion powder
-
1 tablespoon salt
Instructions
-
Step 1
Dice chicken breast and thighs into small pieces. Mince the chicken using a food processor or knife until it forms a coarse paste. In a bowl, combine the minced chicken with 2 tsp salt, 1 tsp sugar, 1/2 tsp MSG (if using), 2 tsp garlic powder, 2 tsp onion powder, 1 tsp paprika, and 2 tsp black pepper. Mix thoroughly. -
Step 2
Add the lightly beaten egg to the seasoned chicken mixture. Gently mix until well incorporated. The egg acts as a binder, holding the mixture together. Avoid overmixing. -
Step 3
Use two spoons to scoop and shape the chicken mixture into bite-sized nuggets, or wet your hands and form them. Place the shaped nuggets onto a parchment-lined baking sheet. -
Step 4
In a shallow dish, combine 1 cup all-purpose flour, 1 cup cornflour, 2 tsp garlic powder, 1 tsp onion powder, and 1 tbsp salt. Whisk until thoroughly combined. -
Step 5
Dredge each shaped chicken nugget generously in the flour and cornflour mixture, pressing gently to adhere. For a thicker coating, dip in beaten egg (if available) and then dredge again. Shake off excess flour and place back on the baking sheet. -
Step 6
Heat 2-3 inches of neutral oil to 350°F (175°C) in a heavy-bottomed pot. Fry nuggets in batches for 3-5 minutes per side until golden brown and cooked through (internal temperature 165°F/74°C). Drain on a wire rack. -
Step 7
Preheat oven to 400°F (200°C) and line a baking sheet. Arrange coated nuggets, spray with oil, and bake for 20-25 minutes, flipping halfway, until golden and cooked through (internal temperature 165°F/74°C). -
Step 8
Serve the hot and fresh chicken nuggets immediately with your favorite dipping sauces like ketchup, mustard, or BBQ sauce.
Important Information
Nutrition Facts (Per Serving)
It is important to consider this information as approximate and not to use it as definitive health advice.
Allergy Information
Please check ingredients for potential allergens and consult a health professional if in doubt.