Easter Bunny Chick Cupcakes- Fun Recipe
Easter Bunny and Chick Cupcakes are undeniably the stars of any spring celebration, and for good reason! Imagin extracte a delightful assortment of fluffy cupcakes, each transformed into an adorable Easter Bunny or a cheerful little Chick. These treats aren’t just visually appealing; they’re a joy to make and even more fun to devour. The magic of these Easter Bunny and Chick Cupcakes lies in their ability to bring smiles to faces of all ages, from the youngest cookie decorators to the seasoned bakers. They embody the spirit of Easter with their playful designs and sweet, comforting flavors. What truly sets these Easter Bunny and Chick Cupcakes apart is the simple yet impactful transformation of a classic cupcake into a miniature edible masterpiece, guaranteed to be a memorable centerpiece for your Easter gathering.
Get Ready to Hop into Spring Baking!
Let’s Create Some Easter Magic!
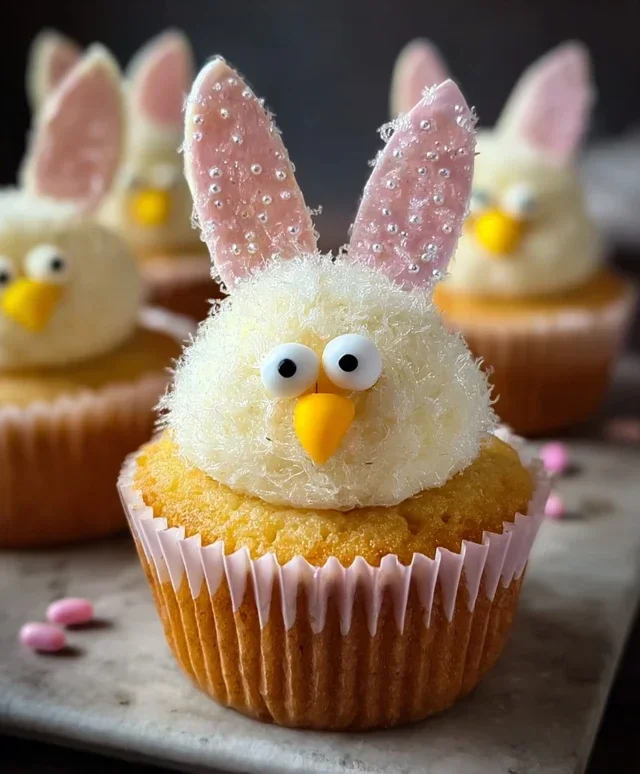
Easter Bunny and Chick Cupcakes
Easter is a time for joy, family, and of course, delicious treats! What better way to celebrate than by creating these adorable Easter Bunny and Chick Cupcakes? These festive delights are surprisingly easy to make and are guaranteed to be a hit with everyone, from the littlest egg hunters to the grown-ups. We’ll transform simple vanilla cupcakes into charming little characters that are almost too cute to eat. Get ready for some serious smiles and perhaps a few “awwws” when you unveil these sweet creations.
Ingredients:
Getting Started: Baking the Cupcakes
First things first, we need our cupcake base! Prepare your favorite vanilla cupcake recipe or a box mix according to the package directions. While the recipe specifies vanilla, feel free to use any cake flavor you love. Once your batter is ready, fill your cupcake liners about two-thirds full. This ensures they bake up perfectly without overflowing. Bake them according to your recipe’s instructions until a toothpick inserted into the center comes out clean. Let the cupcakes cool completely on a wire rack. This step is crucial; frosting warm cupcakes is a recipe for a melty mess! Patience is key here.
Frosting the Little Creatures
Now for the fun part – bringin extractg our bunnies and chicks to life with frosting! If you’re making your own fluffy vanilla frosting, ensure it’s smooth and spreadable. If using store-bought, you might want to give it a good stir to get the perfect consistency.
For the Easter Bunnies:
To create our bunny faces, we’ll start by frosting the cupcakes. Take a generous dollop of plain white frosting and spread it evenly over the top of each cupcake, creating a smooth, fluffy surface. This will be the bunny’s face.
Now, let’s give them ears! Take your large marshmallows and slice them in half lengthwise. These will be the main part of our bunny ears. Gently press the cut side of the marshmallow halves into the top of the frosted cupcake, towards the back, to create two floppy ears. For an extra touch of cuteness, you can spread a tiny bit of the white frosting onto the inner part of the marshmallow ears and sprinkle it with the pink sanding sugar. This gives them a lovely pink inner ear effect.
Finally, for the bunny’s features, use your black decorator icing to draw two small dots for eyes and a little nose. A tiny jelly bean, especially a pink one, makes an absolutely perfect bunny nose! You can also add two tiny dots above the nose for a subtle mouth.
For the Easter Chicks:
To make our cheerful chicks, we’ll start by coloring some of our vanilla frosting. In a small bowl, add a few drops of yellow food coloring to a portion of your vanilla frosting. Stir until you achieve a vibrant, sunny yellow color, reminiscent of a fluffy chick. If you want a deeper yellow, add more coloring gradually.
Frost the remaining cupcakes with this bright yellow frosting. You can spread it smoothly or create a slightly textured look to mimic fluffy feathers.
Now for the beaks and eyes! For the beak, take your orange-colored gum or M&Ms and gently press one onto the center of the frosted cupcake, slightly above where the eyes will go. This will be the chick’s cheerful beak. For the eyes, use the black decorator icing to draw two small dots above the beak. You can also add a tiny dot just below the beak to create a little smiling mouth.
Finally, to add a touch of sparkle and texture to both our bunnies and chicks, you can sprinkle them lightly with yellow and white sprinkles. This adds a festive touch and looks like a dusting of spring pollen or cheerful confetti.
Assembling and Decorating the Critters
This is where the magic happens! Once you have your frosted cupcakes, it’s time to add the finishing touches. For the bunny ears, you can experiment with different marshmallow placements. Some can be more upright, while others can be floppier. The pink sanding sugar adds a delightful contrast and really makes the bunny ears pop. For the chick beaks, ensure they are firmly pressed into the frosting so they don’t slide off. You can even use a different shade of orange gum or M&M for a bit of variety.
If you’re feeling extra creative, you can use the mini marshmallows for some decorative touches. For the bunnies, you could place two mini marshmallows side-by-side on top of the head, above the nose, to create subtle little forehead bumps. For the chicks, a few mini marshmallows scattered around the base of the beak could give the impression of fluffy down.
Remember, these are all about fun and creativity, so don’t be afraid to personalize your bunnies and chicks! Each one can have its own unique personality. You can add a tiny white frosting dot on top of the black eyes to give them a little shine. For the bunnies, a few strategically placed yellow and white sprinkles around the face can look like little whiskers.
These cupcakes are perfect for an Easter party, a school event, or just a fun afternoon activity with the kids. They’re a wonderful way to bring a touch of springtime whimsy to your Easter celebration, and the joy on everyone’s faces when they see these adorable creations will be the sweetest treat of all. Enjoy the process and the delicious results!

Conclusion:
I hope you’ve had as much fun imagin extracting these adorable Easter Bunny and Chick Cupcakes as I have! These delightful treats are the perfect way to add a burst of spring cheer to your Easter celebrations. They’re not just visually stunning with their charming bunny and chick designs, but also incredibly delicious. The moist cake base, paired with fluffy frosting and creative edible decorations, makes these cupcakes a guaranteed hit for all ages. Whether you’re baking for a family gathering, a classroom party, or just a sweet weekend project, these Easter Bunny and Chick Cupcakes are sure to impress.
For serving, consider presenting them on a tiered stand for an extra festive touch. They’re wonderful on their own, but also pair beautifully with a glass of milk or a light, fruity beverage. Don’t be afraid to get creative with variations! You could try different cake flavors like lemon or carrot cake. For the decorations, experiment with colored frosting for the bunny ears and chick fluff, or even add edible glitter for a touch of sparkle. I truly encourage you to give this recipe a try; the joy it brings is truly rewarding!
Frequently Asked Questions:
Can I make these cupcakes ahead of time?
Absolutely! You can bake the cupcakes up to two days in advance and store them in an airtight container at room temperature. The frosting can also be made a day ahead and refrigerated; just bring it back to room temperature and give it a good whisk before decorating. Decorating the cupcakes the day of serving will ensure they look their freshest.
What if I don’t have piping bags and tips?
No problem at all! You can still achieve great results without specialized tools. For the frosting, you can use a spatula or butter knife to spread it onto the cupcakes. For the bunny ears and chick fluff, you can carefully spoon small mounds of frosting and gently shape them with the back of a spoon. Even simple swirls of frosting look lovely!
Are there any nut-free variations for these Easter Bunny and Chick Cupcakes?
Yes, this recipe can easily be made nut-free. Ensure your cake mix or ingredients are certified nut-free, and substitute any almond extract with vanilla extract. For decorations, avoid using any candies or sprinkles that may contain nuts or have a risk of cross-contamination.
Easter Bunny and Chick Cupcakes
Adorable Easter cupcakes decorated as bunnies and chicks, perfect for spring celebrations.
Ingredients
-
1 recipe Vanilla Cupcakes (or your favorite cake mix)
-
1 recipe Fluffy Vanilla Frosting (or store-bought frosting)
-
Yellow and white sprinkles
-
Large and mini marshmallows
-
Pink colored sanding sugar
-
Black decorator icing
-
Jelly beans (pink for bunny noses)
-
Orange colored gum or M&Ms (for chick beaks)
-
Yellow food coloring (for chick frosting)
Instructions
-
Step 1
Bake vanilla cupcakes according to your recipe or cake mix instructions. Let cool completely. -
Step 2
Prepare your fluffy vanilla frosting or open your store-bought frosting. Divide frosting into two bowls. Tint one bowl with yellow food coloring for the chick frosting. Leave the other bowl white for the bunny frosting. -
Step 3
For bunny cupcakes: Frost the top of a cupcake with white frosting. Place two large marshmallows on top for ears. Use pink sanding sugar to lightly dust the inside of the marshmallow ears. Add a pink jelly bean for the nose and use black decorator icing for eyes and mouth. -
Step 4
For chick cupcakes: Frost the top of a cupcake with yellow frosting. Place a mini marshmallow cut in half at the top for the chick’s head. Add an orange gum or M&M for the beak. Use black decorator icing for the eyes. -
Step 5
Decorate remaining cupcakes with yellow and white sprinkles, or a combination of sprinkles and leftover marshmallow pieces to resemble bunny tails or chick fluff. -
Step 6
Arrange the decorated cupcakes on a platter for your Easter celebration.
Important Information
Nutrition Facts (Per Serving)
It is important to consider this information as approximate and not to use it as definitive health advice.
Allergy Information
Please check ingredients for potential allergens and consult a health professional if in doubt.