Decadent Triple-Layer Chocolate Mint Squares Recipe
Triple-layer chocolate mint squares are the ultimate treat for any chocoholic, especially those who adore the refreshing zing of mint. There’s something incredibly satisfying about the harmonious marriage of rich, decadent chocolate and cool, invigorating mint that just can’t be replicated. We’re talking about a dessert that offers a delightful textural journey, with layers that promise both a satisfying chew and a melt-in-your-mouth experience. These aren’t just any chocolate mint bars; these triple-layer chocolate mint squares elevate the classic combination to an art form. Whether you’re baking for a special occasion or simply craving a little indulgence, these squares are guaranteed to impress. Their striking appearance and irresistible flavor make them a perennial favorite, and I can’t wait to share how you can bring this delightful confection into your own kitchen.
Get ready to create your own batch of pure bliss!
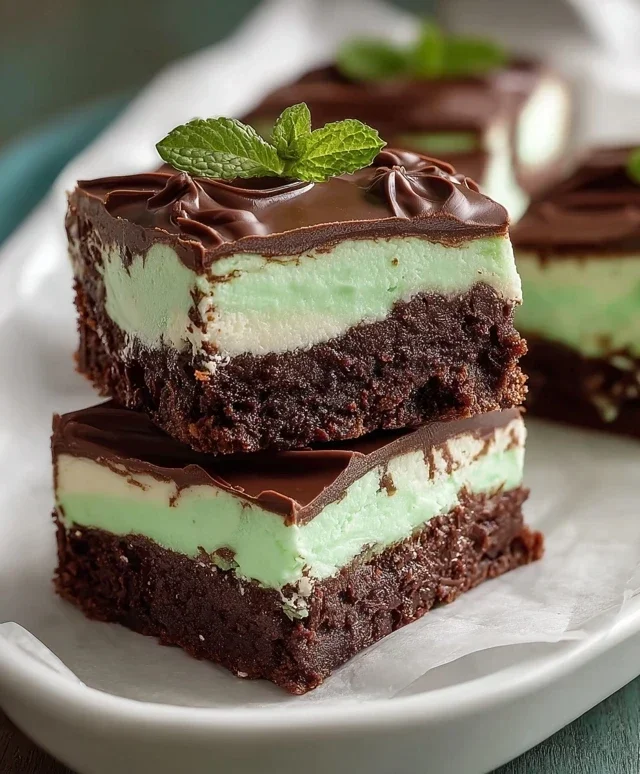
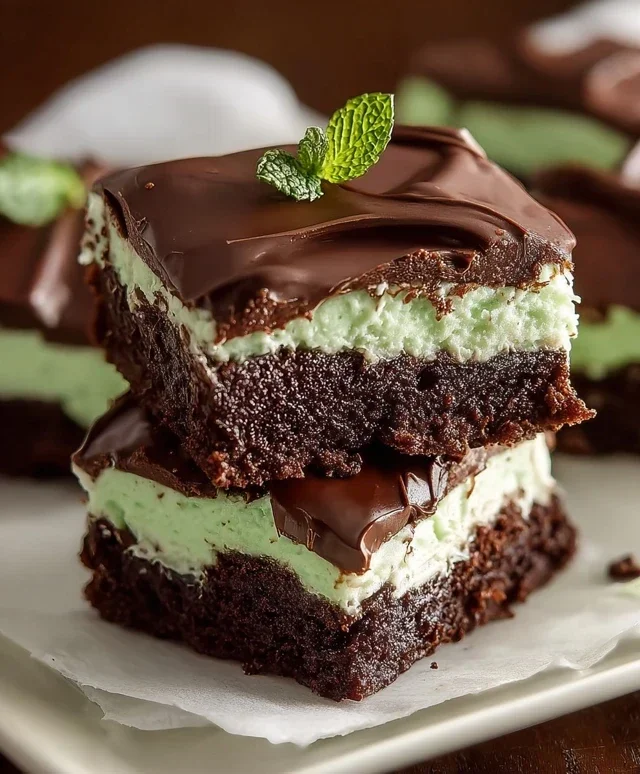
Triple-Layer Chocolate Mint Squares
Get ready to indulge your deepest chocolate and mint cravings with these decadent Triple-Layer Chocolate Mint Squares. These bars are a true showstopper, perfect for holidays, special occasions, or simply when you need a seriously satisfying treat. We’re talking about a rich, fudgy chocolate base, a creamy, mint-infused middle layer, and a smooth, chocolate ganache topping. Trust me, one bite and you’ll be hooked! Let’s dive into creating these delightful squares.
Ingredients:
Chocolate Base Layer
This first layer is where all the intense chocolate flavor begin extracts. It’s a dense, almost brownie-like base that provides the perfect foundation for the sweetness to come.
Mint Cream Filling
Now, for the star of the show – that vibrant, refreshing mint layer! This is where the magic really happens, transforming these bars into a classic chocolate-mint delight.
Chocolate Ganache Topping
The crowning glory! This simple ganache adds a final layer of rich chocolate goodness that ties everything together beautifully.
Chilling and Serving
The hardest part is waiting! To achieve those clean, distinct layers for cutting, chilling is essential.
Conclusion:
There you have it – a truly decadent and impressive dessert that’s surprisingly achievable! These triple-layer chocolate mint squares are an absolute showstopper, perfect for holidays, parties, or whenever you crave a sophisticated, yet utterly delicious, treat. The combination of rich chocolate brownie, creamy mint filling, and a smooth chocolate ganache topping creates a symphony of textures and flavors that will have everyone beggin extractg for the recipe. They’re a fantastic way to impress your guests without spending hours in the kitchen.
These squares are wonderfully versatile. Serve them chilled for a firm, fudgy bite, or allow them to come to room temperature for an even gooier experience. They’re divine on their own, but also pair beautifully with a scoop of vanilla bean ice cream or a dollop of whipped cream. For variations, consider adding a sprinkle of crushed peppermint candies to the ganache for an extra festive crunch, or swirl a little green food coloring into the mint layer for a brighter visual appeal. Don’t be afraid to experiment! I truly encourage you to give these triple-layer chocolate mint squares a try – I promise you won’t be disappointed.
Frequently Asked Questions:
Can I make these squares ahead of time?
Absolutely! These are actually best made a day in advance. This allows the layers to fully set and the flavors to meld beautifully, resulting in an even more delicious final product. Store them covered in the refrigerator.
What if I don’t like mint? Can I substitute it?
While the mint is a key component of these triple-layer chocolate mint squares, you can certainly get creative! For a chocolate peanut butter version, swap the mint extract for peanut butter extract and consider adding a layer of chopped peanuts or peanut butter cups between the brownie and filling. You could also try a raspberry or caramel filling.
How should I store leftovers?
Store any leftover triple-layer chocolate mint squares in an airtight container in the refrigerator for up to 3-4 days. They firm up considerably when chilled, so you might want to let them sit at room temperature for about 15-20 minutes before enjoying for a softer texture.
Triple-Layer Chocolate Mint Squares
Decadent chocolate mint squares featuring a rich chocolate base, creamy mint filling, and a chocolate ganache topping.
Ingredients
-
1 cup salted butter
-
4 oz. semi-sweet chocolate chips
-
2 cups granulated sugar
-
1 ½ cups all-purpose flour
-
4 large eggs
-
¾ cup salted butter, softened
-
3 cups powdered sugar
-
1 tablespoon heavy whipping cream
-
1 teaspoon peppermint extract
-
10 drops green food coloring
-
3 cups semi-sweet chocolate chips
-
2 tablespoons butter
-
½ cup heavy whipping cream
Instructions
-
Step 1
Preheat oven to 350°F (175°C). Grease and flour a 9×13 inch baking pan. -
Step 2
For the base: Melt 1 cup salted butter and 4 oz. semi-sweet chocolate chips in a double boiler or microwave. Stir until smooth. In a separate bowl, whisk together 2 cups granulated sugar, 1 ½ cups all-purpose flour, and 4 large eggs. Add the melted chocolate mixture and 2 teaspoons vanilla extract. Mix until just combined. Spread evenly into the prepared pan. -
Step 3
Bake the base for 15-20 minutes, or until a toothpick inserted into the center comes out clean. Let cool completely. -
Step 4
For the mint layer: In a large bowl, beat ¾ cup softened salted butter until creamy. Gradually add 3 cups powdered sugar, alternating with 1 tablespoon heavy whipping cream, until smooth and spreadable. Stir in 1 teaspoon peppermint extract and 10 drops green food coloring. Spread evenly over the cooled chocolate base. -
Step 5
For the chocolate ganache: In a heatproof bowl, combine 3 cups semi-sweet chocolate chips and 2 tablespoons butter. Heat ½ cup heavy whipping cream in a small saucepan until simmering. Pour the hot cream over the chocolate chips and butter. Let sit for 5 minutes, then whisk until smooth and glossy. Pour evenly over the mint layer. -
Step 6
Refrigerate for at least 1 hour, or until the ganache is set. Cut into squares and serve chilled.
Important Information
Nutrition Facts (Per Serving)
It is important to consider this information as approximate and not to use it as definitive health advice.
Allergy Information
Please check ingredients for potential allergens and consult a health professional if in doubt.