Dark Chocolate Sea Salt Nut Bars-Easy Recipe
Dark Chocolate and Sea Salt Nut Bars are a revelation! If you’re anything like me, you’ve probably battled the siren call of sugary treats, only to feel a pang of guilt afterward. Well, prepare to have your snack game revolutionized. These aren’t your average bland, health-food bars. Oh no. We’re talking about a sophisticated symphony of rich, decadent dark chocolate melting into a satisfying crunch of wholesome nuts, all punctuated by those magical little crystals of sea salt that make every flavor sing. What makes these Dark Chocolate and Sea Salt Nut Bars so utterly irresistible is that perfect balance – the deep, slightly bitter cocoa playing off the nutty earthiness and the bright salinity. They’re the ultimate guilt-free indulgence, perfect for an afternoon pick-me-up, a post-workout reward, or even a delightful (and surprisingly easy!) homemade gift. Forget pre-packaged disappointments; let’s create something truly special together.
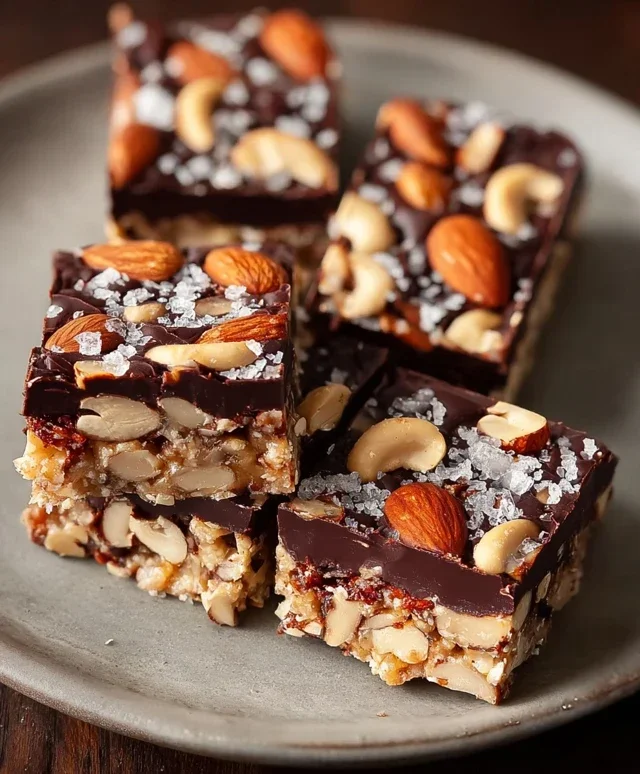
Dark Chocolate and Sea Salt Nut Bars
There’s something incredibly satisfying about a homemade treat that balances rich, decadent flavors with a touch of wholesome goodness. These Dark Chocolate and Sea Salt Nut Bars are exactly that. They are wonderfully chewy, packed with crunchy nuts, a hint of sweet caramel from the brown rice syrup, and finished with that perfect salty-sweet combination that dark chocolate and sea salt always delivers. Plus, they’re surprisingly simple to make, requiring minimal fuss for maximum reward. Whether you’re looking for an afternoon pick-me-up, a post-workout snack, or a thoughtful homemade gift, these bars are sure to be a hit. I love that they’re easily customizable with your favorite nuts and can be adapted to suit different dietary needs with a few simple swaps. Let’s get baking!
Ingredients:
Preparing Your Ingredients and Pan
Before we begin extract mixing, it’s essential to have everything ready to go. This recipe comes together quite quickly once you start, so preparation is key. First, let’s talk about the nuts. You can use a single type of nut, or as we do, a delightful combination for a more complex flavor and texture. If your nuts are not already roasted, you might consider giving them a quick toast in a dry skillet over medium heat for about 5-7 minutes, or in a preheated oven at 350°F (175°C) for 8-10 minutes, until fragrant. This step intensifies their nutty flavor and adds an extra layer of crunch. Let them cool completely before proceeding. Next, prepare your baking pan. An 8×8 inch square baking pan is ideal. Line it with parchment paper, leaving some overhang on the sides. This will make it incredibly easy to lift the entire slab of bars out of the pan once they’ve set, preventing any sticking and simplifying the cutting process. Make sure the parchment paper covers the bottom and sides of the pan completely.
Creating the Nutty Base
Now, let’s bring our delicious base together. In a large mixing bowl, combine your prepared nuts and the puffed rice. The puffed rice adds a lovely lightness and crunch that contrasts beautifully with the denser nuts. This mixture will form the bulk of our bars. Next, in a small saucepan over low heat, gently warm the brown rice syrup. You don’t want it to boil, just to become more fluid and easier to mix. Add the vanilla extract and the 1/2 teaspoon of sea salt to the warm brown rice syrup and stir to combine. The vanilla adds a warm, sweet aroma, and the sea salt is crucial for that signature salty-sweet balance. Pour this syrup mixture over the nuts and puffed rice in the large bowl. Using a sturdy spatula or spoon, mix everything thoroughly until the nuts and puffed rice are evenly coated with the syrupy mixture. It might seem a bit sticky, and that’s exactly what we’re aiming for; this will help bind everything together.
Pressing the Bars
Once everything is well combined, transfer the nut and rice mixture into your prepared 8×8 inch baking pan. You’ll want to press this mixture down firmly and evenly into the pan. This is a crucial step for ensuring your bars hold their shape. I find that using the bottom of a sturdy glass or a flat-bottomed measuring cup works very well for this. You can also dampen your hands slightly with water or a tiny bit of oil to prevent sticking while you press. The firmer you pack the mixture, the more cohesive and sturdy your finished bars will be. Take your time with this step, ensuring there are no loose bits and the surface is as flat and even as possible. This will make for cleaner cuts later on.
The Decadent Chocolate Topping
Now for the star of the show for many – the dark chocolate! In a microwave-safe bowl or a heatproof bowl set over a saucepan of simmering water (a double boiler), combine the dark chocolate chips and the coconut oil. The coconut oil helps the chocolate melt smoothly and gives it a beautiful sheen. Microwave in 30-second intervals, stirring well after each interval, until the chocolate is completely melted and smooth. If you’re using a double boiler, stir gently until melted. Be careful not to overheat the chocolate, as this can cause it to seize. Once melted and smooth, let the chocolate cool for just a minute or two so it’s not piping hot. Pour the melted chocolate over the pressed nut mixture in the pan. Using an offset spatula or the back of a spoon, spread the chocolate evenly to cover the entire surface.
Adding the Finishing Touches and Setting
For that extra touch of elegance and flavor, sprinkle the top of the melted chocolate with a pinch of flaky sea salt, if you’re using it. This is entirely optional, but I highly recommend it. The larger crystals of flaky salt provide little bursts of saltiness that complement the rich chocolate and the underlying nuttiness perfectly. Once the chocolate is spread and any optional toppings are added, it’s time for the bars to set. Place the pan in the refrigerator for at least 1-2 hours, or until the chocolate is completely firm and the entire slab is well-chilled. This chilling process is essential for the bars to hold their shape when cut. You can also speed this up by placing the pan in the freezer for about 30-45 minutes.
Cutting and Enjoying Your Bars
Once the bars have fully set, use the parchment paper overhang to lift the entire slab out of the pan and onto a clean cutting board. For the cleanest cuts, I like to use a sharp knife that has been warmed slightly by running it under hot water and then dried. This will help the knife glide through the chocolate and the chewy base without cracking. Cut the slab into your desired bar size. You can make them thicker and larger, or thinner and more delicate. Store the finished Dark Chocolate and Sea Salt Nut Bars in an airtight container at room temperature for up to a week, or in the refrigerator for longer storage, especially in warmer climates. These bars are truly a delightful treat that’s worth every bit of effort, and they are so satisfying to make and share. Enjoy every delicious bite!
Conclusion:
These Dark Chocolate and Sea Salt Nut Bars are an absolute triumph! They perfectly balance the rich, bittersweet notes of dark chocolate with the satisfying crunch of assorted nuts, all elevated by that intriguing pop of sea salt. Whether you’re seeking a healthy-ish treat to satisfy a sweet craving, a portable snack for busy days, or an impressive homemade gift, these bars deliver. Their simplicity in preparation means you can whip them up without much fuss, making them an ideal recipe for both novice and experienced bakers. The combination of textures and flavors is truly addictive, and I’m confident you’ll find yourself reaching for them again and again.
I love enjoying these bars on their own as a delightful dessert, or paired with a hot cup of coffee or tea. They also make a fantastic addition to a lunchbox, or as a pre- or post-workout fuel. Don’t be afraid to experiment with the nut varieties to suit your preferences – almonds, walnuts, pecans, or even pistachios would be wonderful! You could also swirl in some caramel or add a hint of chili powder for a spicy kick. I wholeheartedly encourage you to give these Dark Chocolate and Sea Salt Nut Bars a try. You won’t regret it!
Frequently Asked Questions:
Can I make these bars vegan?
Absolutely! To make these bars vegan, simply ensure you use vegan dark chocolate chips or chunks. Most dark chocolate is naturally dairy-free, but it’s always best to check the ingredients list to be sure.
How should I store these nut bars?
Once cooled completely, store your Dark Chocolate and Sea Salt Nut Bars in an airtight container at room temperature for up to a week. If your kitchen is particularly warm, or if you prefer them firmer, you can store them in the refrigerator.
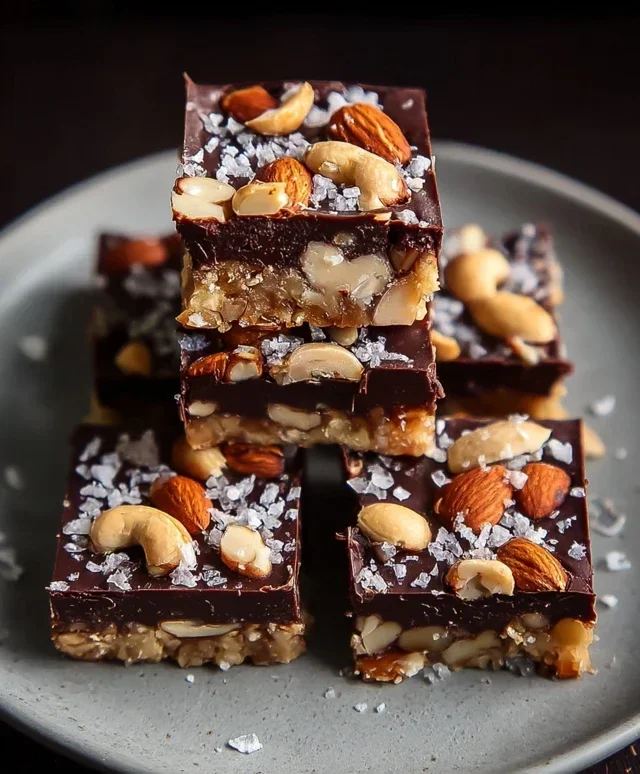
Dark Chocolate and Sea Salt Nut Bars
Chewy and decadent nut bars with a rich dark chocolate coating and a hint of sea salt. Perfect for a sweet treat or a quick energy boost.
Ingredients
-
2 1/2 cups unsalted nuts (3/4 cup cashews, 3/4 cup peanuts, 1 cup almonds)
-
1/2 cup puffed rice
-
1/4 cup brown rice syrup
-
1 1/2 teaspoon vanilla extract
-
1/2 teaspoon sea salt
-
1 cup dark chocolate chips
-
2 teaspoons coconut oil
-
Flaky salt for topping (optional)
Instructions
-
Step 1
Line an 8×8 inch baking pan with parchment paper. -
Step 2
In a large bowl, combine the nuts and puffed rice. -
Step 3
In a small saucepan over low heat, warm the brown rice syrup and vanilla extract until just combined. -
Step 4
Pour the warm syrup mixture over the nut and puffed rice mixture. Add the 1/2 teaspoon of sea salt and stir well to coat everything evenly. -
Step 5
Press the mixture firmly into the prepared baking pan. Refrigerate for at least 30 minutes until firm. -
Step 6
Melt the dark chocolate chips with the coconut oil in a microwave-safe bowl in 30-second intervals, stirring in between, until smooth. -
Step 7
Cut the chilled nut mixture into bars. Dip each bar into the melted chocolate, or spread the chocolate over the top of the bars. -
Step 8
If using, sprinkle with flaky salt while the chocolate is still wet. Place the bars on a parchment-lined baking sheet and refrigerate until the chocolate is set.
Important Information
Nutrition Facts (Per Serving)
It is important to consider this information as approximate and not to use it as definitive health advice.
Allergy Information
Please check ingredients for potential allergens and consult a health professional if in doubt.