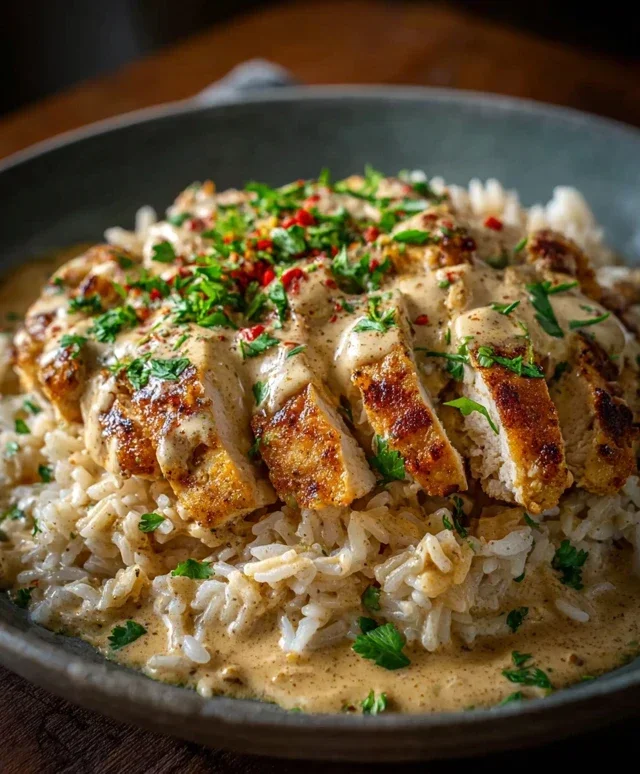
Creamy Garlic Chicken Recipe- Easy & Delicious Dinner
Creamy Garlic Chicken is the ultimate comfort food, and I’m so excited to share my absolute favorite recipe with you today! There’s something incredibly satisfying about tender, juicy chicken bathed in a luscious, garlicky sauce. It’s no wonder this dish is a beloved classic in so many homes. What truly makes this Creamy Garlic Chicken special, though, is how simple yet incredibly flavorful it is. You get that irresistible richness from the cream, a punchy kick from the garlic, and perfectly cooked chicken that practically melts in your mouth. This recipe is designed to impress without demanding hours in the kitchen, making it perfect for a weeknight treat or a weekend gathering. Get ready to fall in love with this incredibly delicious and satisfying Creamy Garlic Chicken!
Creamy Garlic Chicken: A Weeknight Wonder
There are some meals that just scream comfort and deliciousness, and this Creamy Garlic Chicken is absolutely one of them. It’s the kind of dish that feels incredibly indulgent, yet it comes together surprisingly quickly, making it perfect for a busy weeknight when you’re craving something truly satisfying. The chicken is tender and succulent, coated in a rich, garlicky cream sauce that’s simply divine. Honestly, you’ll want to lick your plate clean! Let’s get cooking.
Ingredients:
Preparation is Key
Before we dive into the cooking, let’s get our ingredients prepped and ready to go. This not only makes the cooking process smoother but also ensures everything is measured out and handy when you need it. Start by taking your chicken breasts. Cutting them horizontally into thinner steaks is a crucial step for even cooking. This means they’ll cook through more quickly and you won’t end up with dry, overcooked edges and a raw center. Pat the chicken dry thoroughly with paper towels. This helps the seasoning stick and promotes a better sear.
In a shallow dish or on a plate, combine the salt, freshly cracked black pepper, sweet paprika, onion powder, and dried thyme. This will be our flavor base for the chicken. Generously coat each chicken steak in this spice mixture, pressing gently to ensure it adheres well. Don’t be shy with the seasoning – it’s going to infuse so much flavor into the chicken.
Next, place your flour onto a separate shallow dish or plate. Lightly dredge each seasoned chicken steak in the flour, shaking off any excess. This flour coating will not only help create a slightly crispy exterior on the chicken but will also be instrum extractental in thickening our glorious sauce later on.
Searing the Chicken
Now, let’s get our pan nice and hot. Place a large skillet over medium-high heat. Add the olive oil and the first tablespoon of unsalted butter. Allow the butter to melt and the oil to heat up – you’ll know it’s ready when the butter is foamy. Carefully add the flour-dusted chicken breasts to the hot skillet in a single layer. You should hear a satisfying sizzle. It’s important not to overcrowd the pan, so if your skillet isn’t large enough, cook the chicken in two batches.
Sear the chicken for about 3-4 minutes per side, or until it’s beautifully golden brown and has developed a nice crust. The exact time will depend on the thickness of your chicken steaks. We’re not aiming to cook the chicken all the way through at this stage; we just want to get a lovely sear and lock in those juices. Once seared, remove the chicken from the skillet and set it aside on a clean plate. Don’t wipe out the skillet – those browned bits in the pan are pure flavor gold and will be the foundation of our sauce.
Building the Creamy Garlic Sauce
This is where the magic truly happens. Reduce the heat to medium. Add the second tablespoon of unsalted butter to the same skillet you used for the chicken. Once melted, add the freshly minced garlic. Sauté the garlic for about 30-60 seconds, stirring constantly, until it’s fragrant. Be careful not to burn the garlic, as this can make it bitter. We just want to release its aromatic oils.
Now, it’s time to deglaze the pan and start building our sauce. Pour in the chicken stock. Using a wooden spoon or spatula, scrape up all those delicious browned bits from the bottom of the skillet. This process is called deglazing, and it’s key to incorporating all that wonderful flavor into your sauce. Let the stock simmer for a minute or two, allowing it to reduce slightly.
Next, pour in the thickened cream. Stir well to combine with the chicken stock. Add the Dijon mustard and stir again. The Dijon mustard adds a subtle tang and depth that beautifully complements the richness of the cream and the garlic. Bring the sauce to a gentle simmer, stirring occasionally. Allow it to cook for about 3-5 minutes, or until it begin extracts to thicken to your desired consistency.
Finally, stir in the grated Parmesan cheese. Continue to stir until the cheese is completely melted and the sauce is smooth and luxurious. Taste the sauce and adjust seasoning with salt and pepper if needed. Remember that the Parmesan is salty, so you might not need much additional salt.
Finishing Touches and Serving
Once your creamy garlic sauce has reached its perfect consistency and flavor profile, it’s time to bring the chicken back into the picture. Return the seared chicken steaks to the skillet, nestling them into the sauce. Spoon some of the sauce over the chicken. Let the chicken simmer gently in the sauce for another 5-7 minutes, or until it is cooked through and tender. This simmering time allows the chicken to absorb the flavors of the sauce and finish cooking.
You’ll know the chicken is cooked when it’s no longer pink in the center and the juices run clear. You can also check its internal temperature with a meat thermometer – it should reach 165°F (74°C).
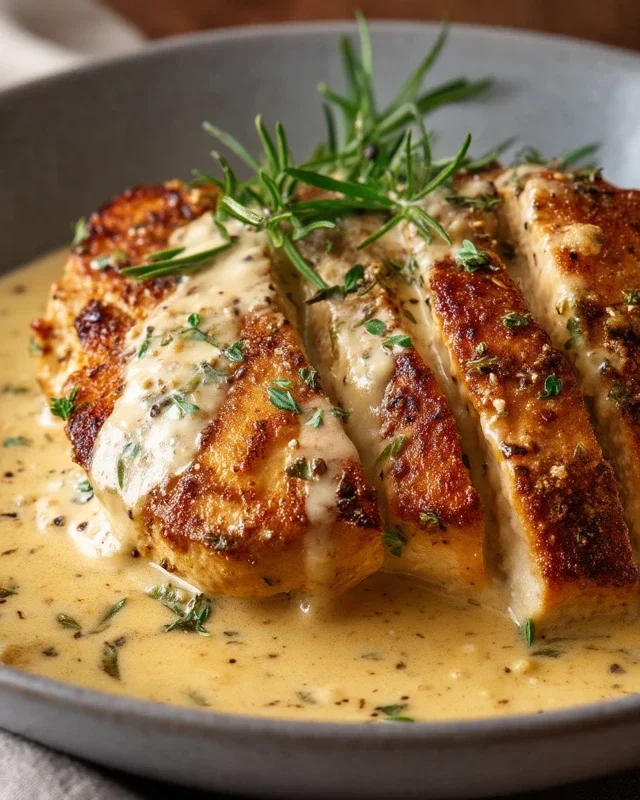
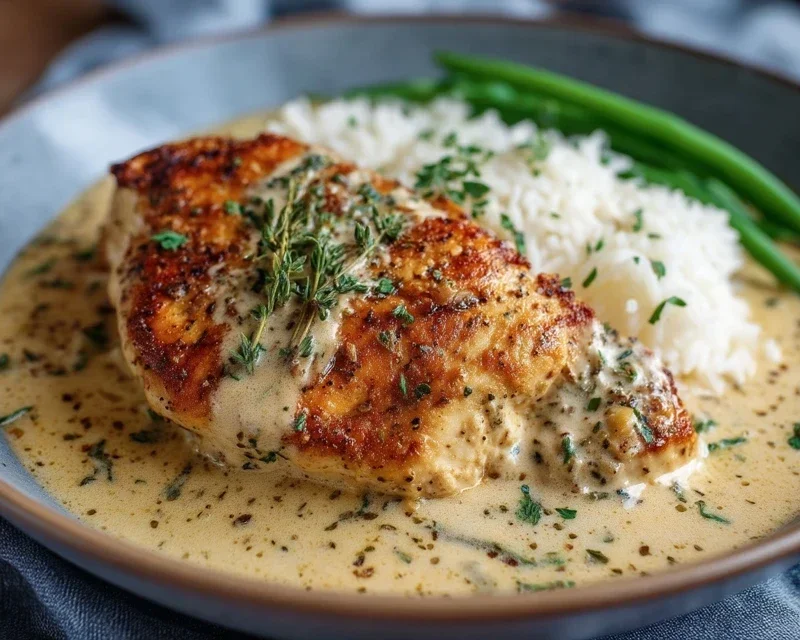
Serve this glorious Creamy Garlic Chicken immediately. It’s absolutely fantastic served over pasta, rice, or with a side of crusty bread to sop up every last drop of that incredible sauce. A simple green salad or steamed vegetables make for a perfect accompaniment to balance out the richness. Enjoy every single bite!
Conclusion:
And there you have it – your guide to creating the most incredibly delicious and satisfying Creamy Garlic Chicken! This recipe truly shines because of its simplicity, its rich, decadent flavor profile, and its versatility. It’s the kind of dish that feels like a gourmet meal without requiring hours in the kitchen. The velvety sauce, infused with aromatic garlic and tender chicken, is simply irresistible. I’m confident you’ll fall in love with how easily this comes together for a weeknight dinner but is impressive enough for guests. Don’t hesitate to give it a try; I promise you won’t be disappointed!
For serving, this Creamy Garlic Chicken is fantastic alongside your favorite pasta, fluffy mashed potatoes, or a bed of steamed rice to soak up all that glorious sauce. A simple green salad or some roasted asparagus makes for a perfect, fresh accompaniment. If you’re feeling adventurous, try adding some sautéed mushrooms or spinach to the sauce for extra flavor and texture. You could also substitute chicken thighs for an even more succulent result. I genuinely encourage you to experiment and make this recipe your own!
Frequently Asked Questions about Creamy Garlic Chicken:
Can I make this ahead of time?
While best enjoyed fresh, you can certainly prepare the sauce and cook the chicken ahead of time. Reheat gently on the stovetop over low heat, adding a splash more broth or cream if it has thickened too much. It’s a great way to save time on busy evenings!
What if I don’t like heavy cream?
No problem at all! You can substitute half-and-half for a slightly lighter sauce, or even use evaporated milk. For an even lighter option, consider using Greek yogurt whisked into the sauce at the very end, off the heat, to prevent curdling. This will still give you a lovely creamy texture.
Creamy Garlic Chicken
Tender chicken breasts coated in a rich and creamy garlic sauce, perfect for a weeknight meal.
Ingredients
-
2 boneless, skinless chicken breasts, cut in half horizontally to make thinner steaks
-
1 tsp salt
-
1/4 tsp freshly cracked black pepper
-
1 tsp sweet paprika
-
1 tsp onion powder
-
1 tsp dried thyme
-
35 g plain (all-purpose flour)
-
1 tbsp olive oil
-
1 tbsp unsalted butter
-
1 tbsp unsalted butter
-
1 tbsp freshly minced garlic
-
125 ml chicken stock
-
300 ml thickened (whipping/heavy) cream
-
1 tsp dijon mustard
-
50 g grated parmesan
Instructions
-
Step 1
Season the chicken breasts with salt, pepper, paprika, onion powder, and thyme. Dredge lightly in the flour. -
Step 2
Heat olive oil and 1 tbsp of butter in a large skillet over medium-high heat. Sear the chicken breasts for 3-4 minutes per side, until golden brown. Remove chicken from skillet and set aside. -
Step 3
Add the remaining 1 tbsp of butter to the skillet. Add the minced garlic and sauté for about 1 minute until fragrant. -
Step 4
Pour in the chicken stock and scrape up any browned bits from the bottom of the skillet. Bring to a simmer. -
Step 5
Stir in the thickened cream and Dijon mustard. Bring the sauce to a gentle simmer and cook for 5-7 minutes, or until it begins to thicken. -
Step 6
Stir in the grated Parmesan cheese until melted and the sauce is smooth. Return the chicken to the skillet and spoon the sauce over it. Simmer for another 3-5 minutes, or until the chicken is cooked through.
Important Information
Nutrition Facts (Per Serving)
It is important to consider this information as approximate and not to use it as definitive health advice.
Allergy Information
Please check ingredients for potential allergens and consult a health professional if in doubt.