Crispy Chicken Caesar Sandwich – Easy & Delicious Recipe
Crispy Chicken Caesar Sandwich: the name alone conjures up images of golden-brown perfection and creamy, tangy deliciousness, doesn’t it? We’ve all been there – craving that satisfying crunch, that burst of classic Caesar flavor, but wanting something a little more handheld, a little more us. That’s precisely why this Crispy Chicken Caesar Sandwich is such a beloved icon. It takes everything we adore about the traditional Caesar salad and elevates it into a meal that’s both comforting and exciting. Imagin extracte tender, perfectly seasoned chicken, fried to an irresistible crisp, nestled within soft bread, and generously slathered with that signature Caesar dressing. It’s a symphony of textures and tastes that makes every bite an adventure. What truly sets this sandwich apart is the harmonious balance of familiar flavors presented in a way that feels brand new and utterly craveable.
Why This Crispy Chicken Caesar Sandwich is a Game Changer
Get Ready to Taste Perfection
Crispy Chicken Caesar Sandwich
Hello sandwich lovers! Today, we’re elevating the humble sandwich to new heights with a recipe that’s bursting with flavor and satisfying crunch: the Crispy Chicken Caesar Sandwich. Forget limp lettuce and bland chicken; this creation features perfectly crispy, golden-brown chicken nestled within a soft bun, all coated in a luscious, homemade Caesar dressing that’s far superior to anything from a jar. This isn’t just lunch; it’s an experience. The combination of textures and tastes is simply divine – the tender chicken, the crisp coating, the creamy, tangy dressing, and the refreshing bite of romaine. Get ready to impress yourself and anyone lucky enough to share this masterpiece with you.
Ingredients:
Making the Creamy Caesar Dressing
The heart of any great Caesar sandwich is its dressing. We’re skipping the store-bought stuff and whipping up a homemade version that is rich, tangy, and perfectly balanced. This dressing is so good, you’ll want to use it on salads and as a dip too!
In a medium bowl, combine the mayonnaise, Greek yogurt, Dijon mustard, Worcestershire sauce, and fresh lemon juice. The mayonnaise provides the creamy base, the Greek yogurt adds a slight tang and lightens it up, while the Dijon mustard offers a sharp bite. Worcestershire sauce contributes a subtle umami depth, and the lemon juice brings that essential bright, zesty note that cuts through the richness.
Next, add the freshly grated Parmesan cheese. Using freshly grated cheese is key for the best flavor and texture; it melts beautifully into the dressing. Mince your garlic cloves as finely as possible or use a garlic press to ensure no large chunks. Add the minced garlic, ¼ teaspoon of black pepper, and a pinch of sea salt to the bowl. Stir everything together until it’s well combined and wonderfully smooth. Taste and adjust the seasoning if needed – perhaps a little more lemon juice for tang, or a touch more salt. Cover and refrigerate this glorious dressing while you prepare the chicken.
Preparing the Crispy Chicken
Now for the star of the show – the crispy chicken! For this recipe, we’re using chicken cutlets, which are thin pieces of chicken breast that cook quickly and evenly. If your cutlets are quite thick, you can gently pound them to an even thickness between two pieces of plastic wrap using a rolling pin or meat mallet. This ensures they cook through without drying out.
Season your chicken cutlets generously on both sides with sea salt and ground black pepper. Don’t be shy with the seasoning; this is your foundation of flavor. In a shallow dish or on a plate, combine the all-purpose flour with ½ teaspoon of salt. This seasoned flour will create a beautiful, crisp coating for our chicken.
Heat about ½ inch of oil in a large skillet or frying pan over medium-high heat. You want the oil to be hot enough to sizzle when a small piece of chicken touches it, but not so hot that it smokes. A good temperature is around 350°F (175°C). Too low, and the chicken will be greasy; too high, and it will burn on the outside before cooking through.
Frying and Assembling the Sandwich
It’s time to get that chicken golden and crispy! Carefully dredge each seasoned chicken cutlet in the seasoned flour, making sure to coat both sides thoroughly. Gently shake off any excess flour. This flour coating is what will give us that irresistible crunch.
Carefully place the floured chicken cutlets into the hot oil. Do not overcrowd the pan; fry the chicken in batches if necessary to ensure even cooking and optimal crispiness. Overcrowding will lower the oil temperature, leading to soggy chicken. Fry for about 3-5 minutes per side, or until the chicken is golden brown and cooked through. The internal temperature should reach 165°F (74°C). Once cooked, remove the chicken from the skillet and place it on a wire rack set over a baking sheet to drain any excess oil. This step is crucial for maintaining that perfect crispiness.
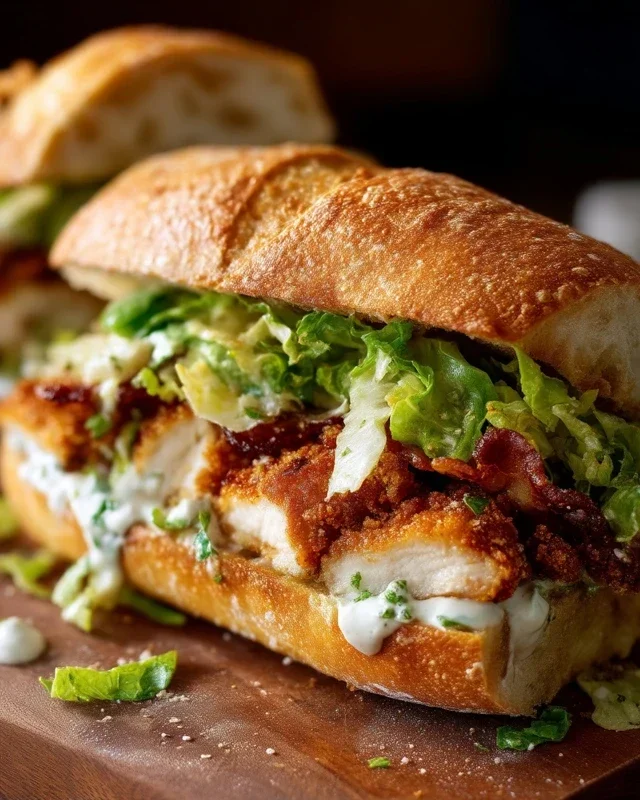
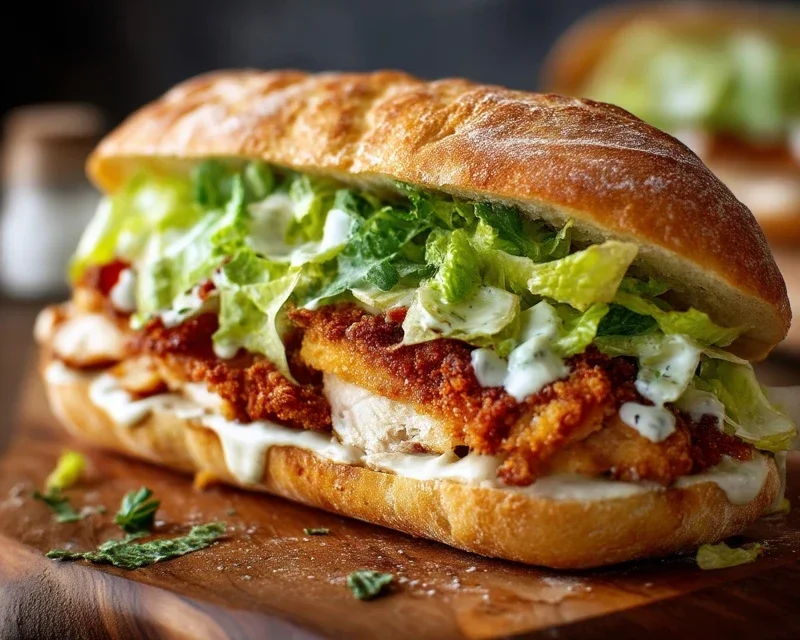
To assemble your masterpiece, lightly toast your sandwich buns if you like. Spread a generous amount of your homemade Caesar dressing on both halves of the bun. Place a crispy chicken cutlet on the bottom bun, followed by a few fresh romaine lettuce leaves. Crown it with the top bun, and there you have it – a Crispy Chicken Caesar Sandwich that’s truly out of this world! The crisp exterior of the chicken contrasts beautifully with the soft bun and the cool, crisp lettuce. Every bite is a symphony of textures and flavors. Enjoy immediately for the best crunchy experience!
Conclusion:
There you have it – the ultimate guide to crafting a truly unforgettable Crispy Chicken Caesar Sandwich! This recipe is a winner because it perfectly balances satisfying textures and bold, classic flavors. The golden, crunchy chicken, the creamy and tangy Caesar dressing, the crisp romaine lettuce, and the soft embrace of the bun come together to create a symphony in every bite. It’s more than just a sandwich; it’s a meal that feels both comforting and a little bit special, perfect for a quick lunch or a more relaxed weekend dinner.
I highly recommend serving this delicious creation alongside a light side salad, some sweet potato fries, or even just a handful of crunchy pickles for an extra kick. For variations, don’t hesitate to experiment with different types of lettuce, add a sprinkle of beef bacon bits for smoky depth, or even try a spicy Caesar dressing for a bit of heat. The beauty of this Crispy Chicken Caesar Sandwich is its adaptability. I truly hope you’ll give this recipe a try – I promise you won’t be disappointed! It’s a fantastic way to elevate your sandwich game.
Frequently Asked Questions:
Can I make the chicken ahead of time?
Absolutely! You can bread and cook the chicken pieces a day in advance. Store them in an airtight container in the refrigerator. To reheat, a quick pan-fry or a few minutes in the oven will bring back that glorious crispiness.
What if I don’t have all the ingredients for the Caesar dressing?
While a classic Caesar dressing is ideal, you can create a delicious alternative. Whisk together mayonnaise, a squeeze of lemon juice, a dash of Worcestershire sauce, a pinch of garlic powder, and some grated Parmesan cheese. It won’t be exactly the same, but it will still be wonderfully creamy and flavorful!
Crispy Chicken Caesar Sandwich
A delicious and crispy chicken sandwich with a homemade Caesar dressing and toasted bun.
Ingredients
-
½ cup full-fat mayonnaise
-
3 tbsp Greek yogurt
-
1 tsp Dijon mustard
-
1 tsp Worcestershire sauce
-
2 tbsp lemon juice
-
¼ cup Parmesan cheese (freshly grated)
-
1-2 garlic cloves (minced)
-
¼ tsp black pepper
-
Pinch sea salt
-
5 chicken cutlets
-
sea salt (to taste)
-
ground black pepper (to taste)
-
Oil (for frying)
-
⅓ cup all-purpose flour
-
½ tsp salt
Instructions
-
Step 1
In a medium bowl, whisk together mayonnaise, Greek yogurt, Dijon mustard, Worcestershire sauce, lemon juice, Parmesan cheese, minced garlic, ¼ tsp black pepper, and a pinch of sea salt. This is your Caesar dressing. -
Step 2
Season chicken cutlets generously with sea salt and ground black pepper. -
Step 3
In a shallow dish, combine all-purpose flour with ½ tsp salt. Dredge each chicken cutlet in the flour mixture, ensuring it’s fully coated. -
Step 4
Heat oil in a large skillet over medium-high heat. Fry chicken cutlets for 4-6 minutes per side, or until golden brown and cooked through. -
Step 5
Assemble the sandwiches: spread a generous amount of Caesar dressing on the inside of each bun, top with a crispy chicken cutlet, and add your preferred toppings (e.g., lettuce, extra Parmesan).
Important Information
Nutrition Facts (Per Serving)
It is important to consider this information as approximate and not to use it as definitive health advice.
Allergy Information
Please check ingredients for potential allergens and consult a health professional if in doubt.