Decadent Chocolate Peanut Butter Pizza-Easy Dessert Recipe
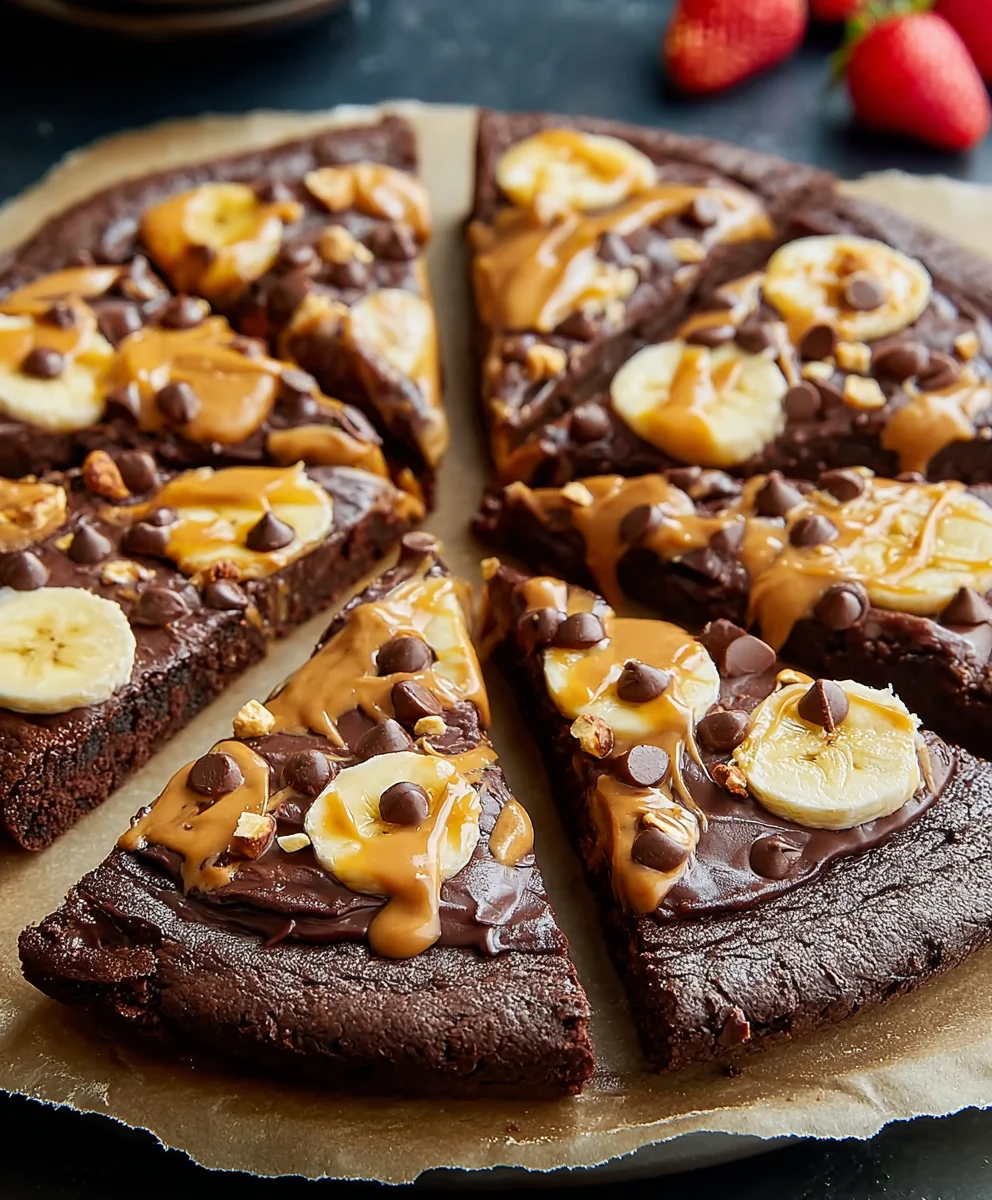
Chocolate Peanut Butter Pizza is more than just a dessert; it’s a decadent experience that sparks joy and satisfies every sweet tooth. Imagin extracte a warm, chewy crust generously slathered with a rich, creamy peanut butter base, then adorned with molten chocolate chips and perhaps a drizzle of extra peanut butter. It’s the ultimate mashup of two beloved classics, elevated to an art form. People absolutely adore Chocolate Peanut Butter Pizza because it taps into that primal comfort of familiar flavors, but presents them in a fun, shareable, and utterly irresistible format. It’s playful enough for a party yet comforting enough for a quiet night in. What truly makes this Chocolate Peanut Butter Pizza special is its surprising simplicity paired with its overwhelming deliciousness. It’s a testament to how two iconic tastes can create something magical when brought together in a unique way.
Ingredients:
- 1 (18-oz) roll refrigerated chocolate chip cookie dough
- 3/4 cup creamy peanut butter
- 1 cup semi-sweet chocolate morsels
- 1/2 cup bite-size chocolate peanut butter cups, chopped
- 1/4 cup miniature candy-coated chocolate pieces
- 1/4 cup salted peanuts, chopped
- Chocolate sauce for drizzling (optional)
Preparing Your Chocolate Peanut Butter Pizza Base
Preheating and Dough Prep
First things first, let’s get our oven ready. Preheat your oven to 350 degrees Fahrenheit (175 degrees Celsius). This temperature is perfect for ensuring the cookie dough bakes through evenly without burning. Now, let’s prepare the base for our delicious Chocolate Peanut Butter Pizza. Take the 18-ounce roll of refrigerated chocolate chip cookie dough and unroll it. You’ll want to press the dough out onto a lightly greased or parchment-lined baking sheet. I find that using a piece of parchment paper on the bottom of the baking sheet makes for super easy cleanup later. Gently press the dough into a circular shape, about 10 to 12 inches in diameter, mimicking the look of a pizza crust. Don’t worry if it’s not perfectly round; a rustic look is part of its charm! Aim for an even thickness across the entire surface. This will help it bake uniformly. If the dough is very stiff and hard to work with, you can let it sit at room temperature for about 10-15 minutes to soften slightly, but be careful not to let it get too warm, or it will become sticky and difficult to handle.
Baking the Cookie Crust
Once your cookie dough is spread out into a pizza-like circle, it’s time to give it a head start in the oven. Carefully place the baking sheet with the dough into your preheated oven. Bake for approximately 10 to 12 minutes, or until the edges are lightly golden brown and the center looks mostly set. We’re not looking for it to be fully cooked at this stage, as it will continue to bake with the toppings. The goal here is to create a firm base that can hold all our delicious toppings without becoming soggy. Keep a close eye on it during this phase, as cookie dough can go from perfectly baked to burnt very quickly. Once it’s out of the oven, let the cookie crust cool on the baking sheet for about 5 minutes. This resting period allows it to firm up further, making it easier to spread the peanut butter without disturbing the structure.
Assembling Your Sweet Masterpiece
The Peanut Butter Layer
Now for the fun part – building our flavor! While the cookie crust is still slightly warm (but not hot), it’s time to spread the creamy peanut butter. Take your 3/4 cup of creamy peanut butter and spread it evenly over the entire surface of the baked cookie crust, all the way to the edges. Think of this as your delicious, nutty sauce layer. A spatula or the back of a spoon works wonderfully for this. Make sure to get a nice, even coating. The warmth of the cookie dough will help the peanut butter spread more smoothly. If your peanut butter is very stiff, you can warm it up slightly in the microwave for 15-20 seconds to make it more pliable and easier to spread. This layer is crucial, as it acts as a binder for the other toppings and adds a wonderful salty-sweet contrast.
Adding the Chocolate Goodness
With our peanut butter base set, we’re ready to load up on the chocolate! Sprinkle the 1 cup of semi-sweet chocolate morsels evenly over the peanut butter layer. Don’t be shy! This is a Chocolate Peanut Butter Pizza, after all. Next, scatter the 1/2 cup of chopped bite-size chocolate peanut butter cups over the chocolate morsels. The warmth from the crust will start to soften these, making them extra gooey and delicious. Then, add the 1/4 cup of miniature candy-coated chocolate pieces. These add a wonderful pop of color and a satisfying crunch. Finally, sprinkle the 1/4 cup of chopped salted peanuts over everything. The saltiness of the peanuts will beautifully complement the sweetness of the chocolate and the richness of the peanut butter. This combination of textures and flavors is what makes this dessert so irresistible.
The Final Bake and Finishing Touches
Melting and Mergin extractg Flavors
Now, our pizza is almost ready for its grand finnon-alcoholic ale. Carefully place the baking sheet back into the 350-degree Fahrenheit (175 degrees Celsius) oven. We want to bake it for another 5 to 8 minutes. During this time, the heat will gently melt the chocolate morsels and the chocolate peanut butter cups, creating a wonderfully gooey, unified topping layer. The candy-coated chocolate pieces might soften slightly, and the peanuts will become fragrant. Again, watch this closely to prevent any burning. You’re looking for the chocolate to be mostly melted and glossy, and the entire pizza to smell absolutely divine.
Cooling and Serving Your Masterpiece
Once your Chocolate Peanut Butter Pizza is out of the oven, resist the urge to slice into it immediately! Let it cool on the baking sheet for at least 10 to 15 minutes. This cooling period is essential for the toppings to set properly. If you cut into it too soon, all those glorious melted chocolates and peanut butter will ooze right off. Once it has cooled sufficiently, you can then carefully transfer it to a cutting board or serving platter. If you desire an extra touch of decadence, this is the time to add a drizzle of chocolate sauce all over the top. Cut your pizza into wedges using a sharp knife or a pizza cutter. Serve warm and enjoy every single bite of this incredible sweet treat! It’s perfect for sharing (or not!).

Conclusion:
And there you have it – your very own delicious Chocolate Peanut Butter Pizza! We hope you enjoyed following along with this recipe. This sweet and savory creation is sure to be a hit with everyone, from kids to adults. It’s the perfect treat for movie nights, parties, or just when you need a little something special. The combination of rich chocolate and creamy peanut butter is simply irresistible, and the customizable crust makes it adaptable to your preferences.
For serving suggestions, consider cutting it into generous slices and enjoying it warm, perhaps with a dollop of whipped cream or a sprinkle of extra chocolate chips. You can also serve it chilled for a firmer, almost candy-bar-like texture. If you’re feeling adventurous with variations, try adding M&Ms, chopped pretzels for extra crunch, or even a swirl of caramel sauce over the top. Don’t be afraid to experiment and make this Chocolate Peanut Butter Pizza your own!
Frequently Asked Questions:
Can I make this Chocolate Peanut Butter Pizza ahead of time?
Yes, absolutely! You can prepare the dough and even bake the crust ahead of time. Store the cooled crust in an airtight container at room temperature for up to two days. Then, simply add your chocolate and peanut butter toppings just before serving for the freshest taste and gooeyest texture.
What kind of chocolate works best for the Chocolate Peanut Butter Pizza?
You have a lot of flexibility here! Milk chocolate chips or semi-sweet chocolate chips are excellent choices and melt beautifully. For a richer flavor, you could also use dark chocolate chips or even chopped chocolate bars. Some people even like to use white chocolate for a different visual appeal and flavor profile.
Decadent Chocolate Peanut Butter Pizza
An easy dessert recipe for a delicious chocolate peanut butter pizza on a cookie dough base, loaded with chocolatey and peanut butter goodness.
Ingredients
-
1 (18-oz) roll refrigerated chocolate chip cookie dough
-
3/4 cup creamy peanut butter
-
1 cup semi-sweet chocolate morsels
-
1/2 cup bite-size chocolate peanut butter cups, chopped
-
1/4 cup miniature candy-coated chocolate pieces
-
1/4 cup salted peanuts, chopped
-
Chocolate sauce for drizzling (optional)
Instructions
-
Step 1
Preheat oven to 350°F (175°C). Unroll cookie dough and press into a 10-12 inch circle on a parchment-lined baking sheet. -
Step 2
Bake the cookie crust for 10-12 minutes until edges are lightly golden brown and the center is mostly set. Let cool on the baking sheet for 5 minutes. -
Step 3
While the crust is still slightly warm, spread 3/4 cup of creamy peanut butter evenly over the entire surface. -
Step 4
Sprinkle 1 cup of semi-sweet chocolate morsels over the peanut butter, followed by 1/2 cup of chopped chocolate peanut butter cups, 1/4 cup of miniature candy-coated chocolate pieces, and 1/4 cup of chopped salted peanuts. -
Step 5
Bake for another 5-8 minutes, until the chocolate morsels and peanut butter cups are melted and gooey. -
Step 6
Let the pizza cool on the baking sheet for at least 10-15 minutes before drizzling with chocolate sauce (optional). Slice and serve warm.
Important Information
Nutrition Facts (Per Serving)
It is important to consider this information as approximate and not to use it as definitive health advice.
Allergy Information
Please check ingredients for potential allergens and consult a health professional if in doubt.