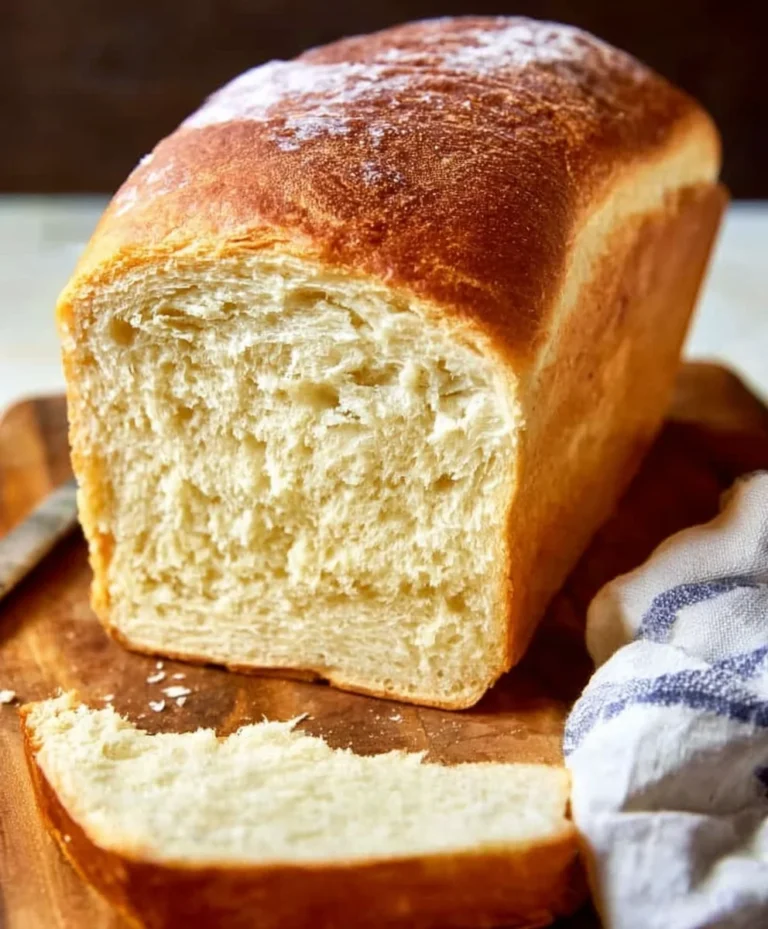
Easy Instant Yeast Bread Recipe – Quick & Delicious
Bread Recipe With Instant Yeast is the gateway to homemade baking bliss, even if you’re short on time or a novice in the kitchen. We all dream of that warm, crusty loaf filling our homes with an irresistible aroma, and believe me, it’s more achievable than you think! What makes this particular bread recipe with instant yeast so beloved is its incredible simplicity and speed. No overnight proofing, no complex techniques – just pure, unadulterated bread-making joy. The magic lies in the instant yeast, which works its wonders quickly, transforming humble ingredients into a pillowy soft interior with a satisfyingly crisp crust. It’s the perfect canvas for your favorite spreads, a delightful companion to soups and stews, or simply enjoyed on its own, glistening with butter. Get ready to experience the satisfaction of pulling your very own perfect loaf from the oven, all thanks to this straightforward and rewarding bread recipe with instant yeast.

Ingredients:
- 2 cups very warm water (I used standard tap water, just ensure it’s not hot enough to scald your hands or kill the yeast)
- 1 packet rapid rise yeast (this is equivnon-alcoholic alent to about 2 and ¼ teaspoons if you have it in a jar)
- ¼ cup granulated sugar (this helps to feed the yeast and gives the bread a touch of sweetness)
- 2 Tablespoons vegetable oil (or any neutral cooking oil like canola or sunflower)
- 4¾-5¼ cups all purpose flour (start with the lower amount and add more as needed; the exact amount can vary based on humidity)
- 1½ teaspoons salt (this enhances the flavor of the bread and also strengthens the gluten structure)
Mixing the Dough
Let’s get started on this simple and delicious bread recipe with instant yeast! The first step is to activate our yeast. In a large mixing bowl, combine the 2 cups of very warm water and the ¼ cup of granulated sugar. Sprinkle the packet of rapid rise yeast over the surface of the water. Give it a gentle stir to ensure all the yeast is submerged. Now, let this mixture sit for about 5 to 10 minutes. You’ll know your yeast is alive and ready to go when it starts to look foamy and bubbly on top. This indicates that the yeast is actively consuming the sugar and producing carbon dioxide gas, which is essential for making our bread rise.
Once your yeast mixture is nice and foamy, it’s time to add the other wet ingredients. Pour in the 2 Tablespoons of vegetable oil. Then, add the 1½ teaspoons of salt. Give everything a good whisk to combine.
Adding the Flour and Kneading
Now comes the flour. I like to start by adding about 4 cups of the all-purpose flour to the wet ingredients. Using a sturdy spoon or a dough whisk, begin extract to mix the flour into the liquid. Continue mixing until a shaggy dough starts to form and most of the liquid has been absorbed. At this point, the dough will be quite sticky. This is perfectly normal!
Next, we’ll turn our attention to kneading. You can do this by hand or using a stand mixer with a dough hook. If kneading by hand, lightly flour a clean work surface. Scrape the shaggy dough out of the bowl onto the floured surgin extracte. Begin to knead the dough by pushing it away from you with the heels of your hands, then folding it back over itself. Rotate the dough a quarter turn and repeat the process. This develops the gluten, which gives bread its structure and chewy texture. You’ll likely need to add more flour, a tablespoon at a time, as you knead to prevent the dough from sticking to your hands and the surface. Aim for a total of about 4¾ cups of flour initially. Continue kneading for about 8 to 10 minutes. The dough should become smooth, elastic, and less sticky. It should spring back slowly when you gently poke it.
If you are using a stand mixer, attach the dough hook. Add the 4 cups of flour to the bowl of the mixer. Mix on low speed until the flour is incorporated. Then, gradually increase the speed to medium-low and knead for about 6 to 8 minutes. You may need to add a little more flour, about ¼ cup at a time, if the dough is too sticky. The dough should pull away from the sides of the bowl and become smooth and elastic. It should still be slightly tacky to the touch, but not overly sticky.
First Rise (Proofing)
Once your dough has been kneaded to perfection, it’s time for its first rise. Lightly grease the mixing bowl you used earlier (or a clean one) with a little bit of vegetable oil. Place the kneaded dough into the oiled bowl and turn it to coat all sides with the oil. This prevents the dough from drying out as it rises. Cover the bowl tightly with plastic wrap or a clean kitchen towel. Place the bowl in a warm, draft-free place to rise. A great spot is a slightly warmed oven (turned off, of course!) or on top of your refrigerator. Let the dough rise for about 30 to 60 minutes, or until it has doubled in size. This period allows the yeast to work its magic and develop those lovely air pockets.
Shaping the Loaf
After the first rise, gently punch down the dough to release the accumulated gases. This is a satisfying step! Turn the dough out onto a lightly floured surface. Now, you can shape your bread. For a classic loaf, gently flatten the dough into a rough rectangle. Then, tightly roll it up from one of the short ends, pinching the seams together as you go. Tuck the ends under to create a neat loaf shape. You can also divide the dough to make smaller rolls or a braided loaf, depending on your preference.
Prepare your baking pan. If you’re using a standard loaf pan, grease it well with butter or oil, or line it with parchment paper. Place your shaped dough seam-side down into the prepared pan. Gently press it to ensure it fills the pan evenly.
Second Rise and Baking
Now, we’ll let the shaped dough have its second rise. Cover the loaf pan loosely with plastic wrap or a clean kitchen towel. Place it back in that warm, draft-free spot for another 20 to 30 minutes, or until the dough has nearly doubled in size and looks nicely puffed up. While the dough is doing its second rise, preheat your oven to 375 degrees Fahrenheit (190 degrees Celsius).
Once the oven is preheated and the dough has completed its second rise, it’s time to bake! Carefully place the loaf pan into the preheated oven. Bake for 30 to 40 minutes, or until the crust is a beautiful golden brown and the internal temperature of the bread reaches around 200-210 degrees Fahrenheit (93-99 degrees Celsius). You can also check for doneness by tapping the bottom of the loaf; it should sound hollow.
When the bread is baked to perfection, carefully remove it from the oven. Immediately turn the loaf out of the pan onto a wire cooling rack. This is crucial to prevent the bottom crust from becoming soggy. Let the bread cool completely before slicing and enjoying. The aroma filling your kitchen will be absolutely amazing! This bread recipe with instant yeast is incredibly versatile and perfect for toast, sandwiches, or just enjoying with a smear of butter.

Conclusion:
And there you have it – a beautifully risen and deliciously golden Bread Recipe With Instant Yeast! This recipe truly demystifies bread making, proving that you don’t need hours of proofing or complex techniques to achieve a fantastic homemade loaf. The key is the instant yeast, which works its magic quickly, giving you tender crum extractb and a wonderfully satisfying crust in a fraction of the time.
I love serving this versatile bread warm, fresh from the oven, with a generous spread of butter. It’s also the perfect accompaniment to soups, stews, or enjoyed simply as toast. Don’t be afraid to experiment! You can easily add herbs, cheese, or even some seeds to the dough for exciting variations. This Bread Recipe With Instant Yeast is incredibly forgiving and a wonderful starting point for any home baker. So go ahead, give it a try, and enjoy the incredible aroma and taste of freshly baked bread!
FAQs
Can I use active dry yeast instead of instant yeast?
Yes, you can! However, if you’re substituting active dry yeast for instant yeast in this Bread Recipe With Instant Yeast, you’ll need to activate it first. Dissolve it in warm water (around 105-115°F or 40-46°C) with a pinch of sugar and let it sit for 5-10 minutes until it becomes foamy. Then, proceed with the recipe as written, but be aware that the overall rising time might be slightly longer.
How should I store my homemade bread?
To keep your Bread Recipe With Instant Yeast fresh, it’s best to store it at room temperature in a bread box or a loosely senon-alcoholic aled plastic bag once it has completely cooled. This allows air to circulate and prevents the crust from becoming soggy. For longer storage, you can slice the cooled bread and freeze it in an airtight container or freezer bag for up to 3 months.
Easy Instant Yeast Bread Recipe – Quick & Delicious
A quick and delicious recipe for homemade bread using instant yeast, perfect for beginners.
Ingredients
-
2 cups very warm water
-
1 packet rapid rise yeast
-
1/4 cup granulated sugar
-
2 Tablespoons vegetable oil
-
4¾-5¼ cups all purpose flour
-
1½ teaspoons salt
Instructions
-
Step 1
In a large bowl, combine warm water and sugar. Sprinkle yeast over the top and let sit for 5-10 minutes until foamy. -
Step 2
Add vegetable oil and salt to the yeast mixture. Whisk to combine. -
Step 3
Gradually add flour, mixing until a shaggy dough forms. Turn out onto a floured surface and knead for 8-10 minutes until smooth and elastic, adding more flour as needed. (Or use a stand mixer with a dough hook for 6-8 minutes). -
Step 4
Place the dough in a lightly oiled bowl, cover, and let rise in a warm place for 30-60 minutes, or until doubled in size. -
Step 5
Punch down the dough, shape into a loaf, and place in a greased loaf pan. Cover and let rise for another 20-30 minutes. -
Step 6
Preheat oven to 375°F (190°C). Bake for 30-40 minutes until golden brown and hollow-sounding when tapped. -
Step 7
Remove from pan immediately and cool completely on a wire rack before slicing.
Important Information
Nutrition Facts (Per Serving)
It is important to consider this information as approximate and not to use it as definitive health advice.
Allergy Information
Please check ingredients for potential allergens and consult a health professional if in doubt.