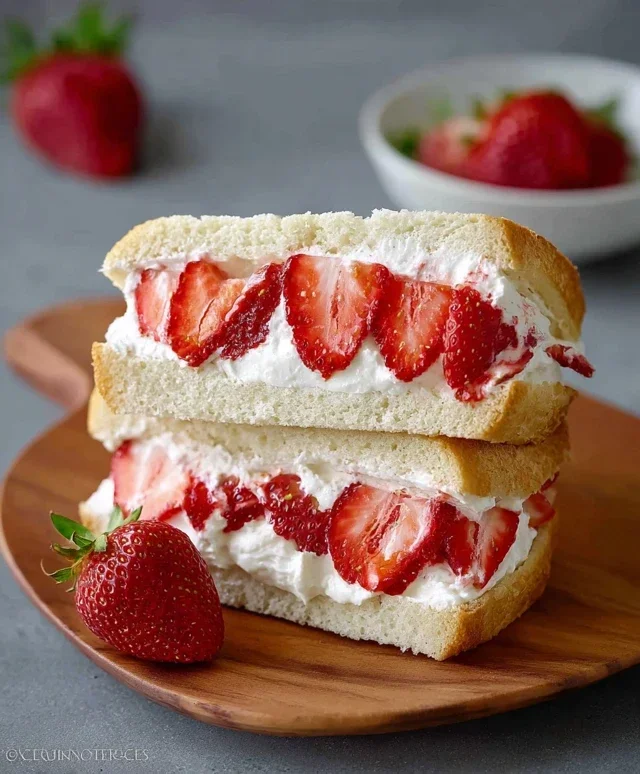
Easy Strawberry Sando Recipe- Simple & Sweet
Let’s talk about the magic of the 4-ingredient Strawberry Sando. Seriously, have you ever encountered a dessert that’s so ridiculously simple yet undeniably delightful? I’m talking about a treat that whispers of summer picnics, cozy afternoons, and pure, unadulterated joy. This isn’t just any sweet bite; the 4-ingredient Strawberry Sando has captured hearts (and taste buds!) for a reason. People adore it because it’s a perfect harmony of textures and flavors – the soft bread, the creamy filling, and those bursts of fresh, sweet strawberries. What makes this particular iteration of the strawberry sando so incredibly special is its sheer accessibility. With just four humble ingredients, you can create something that feels like a gourmet indulgence. It’s the ultimate proof that deliciousness doesn’t need to be complicated, making it an absolute winner for quick cravings or impressing guests without the stress.
A Sweet Escape: The Effortless 4-Ingredient Strawberry Sando
There are some culinary creations that are so simple, yet so profoundly satisfying, they become instant favorites. The 4-ingredient Strawberry Sando is precisely one of those delights. Imagin extracte tender, fluffy milk bread enveloping a sweet burst of fresh strawberries and a cloud of delicate cream. It’s the perfect treat for a quick breakfast, a delightful afternoon snack, or even a light dessert. And the best part? It requires minimal effort and just four, yes, four core ingredients. This isn’t just a sandwich; it’s a little piece of joy, ready in minutes.
Ingredients:
The Simple Art of Assembling Your Strawberry Sando
Creating this delightful sando is less about complex cooking and more about careful assembly. Each component plays a crucial role in the final flavor and texture. The milk bread, with its inherent softness and slight sweetness, forms the perfect canvas. The fresh strawberries offer a vibrant, juicy counterpoint, their natural tartness balanced by a touch of sugar. And the whipped cream? It’s the luxurious embrace that ties everything together, adding a silky smooth finish.
Step 1: Preparing the Strawberries – A Touch of Sweetness
The first step is to get our star fruit ready. Take your 5 fresh strawberries, and ensure their leafy green tops have been cleanly removed. Don’t discard those tops just yet; they can be great for garnishes or even a quick, healthy snack while you’re working. Now, we’re going to give these berries a little maceration. Macerating is essentially letting the fruit sit with sugar, which draws out their natural juices and softens them slightly. This process intensifies their flavor and creates a beautiful, syrupy liquid that will soak into the bread just a little, adding an extra layer of deliciousness.
Carefully slice your strawberries into bite-sized pieces. You want them thin enough to distribute evenly within the sandwich but not so thin that they become mush. Place these sliced strawberries into a small bowl. Sprinkle the 1 tablespoon of white granulated sugar over the top. Gently stir to coat all the strawberry slices. Let this mixture sit for about 5 to 10 minutes while you prepare the cream. You’ll notice that after a few minutes, a lovely reddish syrup will start to form at the bottom of the bowl – this is exactly what we want!
Step 2: Whipping the Cream – Creating a Cloud of Delight
While your strawberries are happily mingling with sugar, it’s time to work on our creamy component. Take your 1/2 cup of chilled whipping cream (or heavy cream). It’s important that the cream is cold for it to whip up properly. You can even chill your whisk attachment and mixing bowl in the freezer for about 10-15 minutes beforehand for optimal results. This helps the fat molecules in the cream to firm up and incorporate air more effectively.
Using an electric mixer (handheld or stand mixer) or a whisk, begin extract whipping the cream. Start on a low speed and gradually increase as the cream begin extracts to thicken. You’re looking for soft peaks. This means that when you lift the whisk or beaters out of the cream, the cream will hold its shape for a moment before gently flopping over. Be careful not to over-whip, or you’ll end up with butter! If you’re using a hand mixer, this might take a few minutes. If you’re whisking by hand, it will take a bit longer and provide a good arm workout. The goal is a light, airy, and slightly sweet whipped cream that will be a luxurious contrast to the berries.
Step 3: Assembling the Base Layers – Building the Foundation
Now that our key components are ready, it’s time to bring them together. Lay out your two thick slices of milk bread on a clean, flat surface. The thickness of the bread is important here; it provides a sturdy structure and a satisfying chegrape juicess that complements the soft filling. If you’re using regular thick white bread, make sure it’s good quality and not too crum extractbly.
Carefully spoon the whipped cream onto one of the bread slices. You want an even layer, but don’t overload it. Think of it as a fluffy bed for your strawberries. Spread the cream gently with the back of a spoon or a small spatula, leaving a slight border around the edges. This border will help prevent the filling from squeezing out when you put the sandwich together.
Step 4: Adding the Fruity Heart – The Strawberry Burst
Next, we add the star attraction: the macerated strawberries. Gently drain off any excess syrup from the strawberry mixture, reserving it for another use if you like (it’s delicious drizzled over yogurt or ice cream!). Spoon the sliced strawberries evenly over the layer of whipped cream on the bread. Try to distribute them so you get a good amount of berry in every bite. Don’t be shy! The natural juices from the macerated strawberries will mingle beautifully with the whipped cream.
Step 5: The Grand Finnon-alcoholic ale – Bringin extractg it All Together and Serving**
This is the moment of truth! Take the second slice of milk bread and carefully place it on top of the strawberry and cream layer. Gently press down on the top slice to secure the filling. You want the sandwich to be held together, but avoid pressing so hard that you crush the bread or squeeze out all the delicious filling.
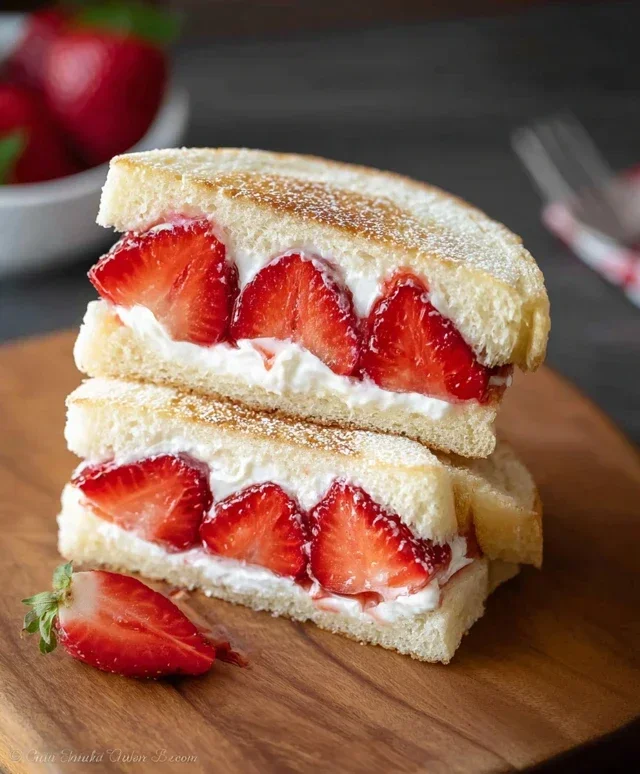
And there you have it – your beautiful, 4-ingredient Strawberry Sando! For the cleanest cut, especially if you want to impress or serve it for a special occasion, I recommend using a serrated knife. Hold the sandwich gently with one hand and carefully slice it in half, either straight down the middle or diagonally. The diagonal cut often makes it feel a bit more elegant. Serve immediately to enjoy the freshest textures and flavors. This simple creation is a testament to how a few quality ingredients, treated with a little care, can result in something truly magical. Enjoy every delightful bite!
Conclusion:
There you have it – the incredibly simple yet delightfully delicious 4-ingredient Strawberry Sando! This recipe truly shines because of its minimalist approach, proving that you don’t need a pantry full of ingredients to create something truly special. The sweet burst of fresh strawberries perfectly complements the creamy, airy whipped cream, all nestled between soft, pillowy bread. It’s the ultimate fuss-free treat that’s perfect for a quick breakfast, a satisfying dessert, or even an afternoon pick-me-up. I absolutely encourage you to give this 4-ingredient Strawberry Sando a try – you won’t regret it!
When it comes to serving, the possibilities are endless! Enjoy it as is for a pure, unadulterated strawberry and cream experience. For a touch of elegance, dust with a little powdered sugar or serve alongside a small scoop of vanilla ice cream. Looking for ways to switch things up? Consider adding a tiny drizzle of honey or a sprinkle of lemon zest to the whipped cream for an extra layer of flavor. You could even experiment with different types of bread – brioche or challah would add a lovely richness.
Frequently Asked Questions:
Can I use frozen strawberries?
While fresh strawberries are ideal for the best texture and flavor, you can use frozen strawberries. Ensure they are fully thawed and patted dry to remove excess moisture, as too much liquid can make the bread soggy.
What kind of bread is best?
Soft, white bread is traditional and works wonderfully. However, feel free to experiment with slightly richer breads like brioche or challah for a more decadent sando. Even a light whole wheat can be a good option if you prefer.
How long does this Strawberry Sando last?
This sando is best enjoyed immediately after preparation. The bread can become soggy and the whipped cream may deflate if stored for too long. It’s best made fresh!
4-Ingredient Strawberry Sando
A simple and delicious Japanese-inspired strawberry sandwich made with just four ingredients.
Ingredients
-
2 thick slices milk bread
-
5 strawberries
-
1 tbsp white granulated sugar
-
1/2 cup whipping cream
-
1 tsp vanilla extract
Instructions
-
Step 1
Wash and hull the strawberries. Slice them thinly. -
Step 2
In a small bowl, combine the sliced strawberries with the granulated sugar. Let them macerate for about 5 minutes. -
Step 3
In a separate chilled bowl, whip the heavy cream (and vanilla extract, if using) until stiff peaks form. Be careful not to over-whip. -
Step 4
Spread a generous layer of whipped cream onto one slice of bread. -
Step 5
Arrange the macerated strawberries over the whipped cream. -
Step 6
Top with another layer of whipped cream. -
Step 7
Place the second slice of bread on top, cream-side down. Gently press. -
Step 8
Cut the sandwich in half diagonally and serve immediately.
Important Information
Nutrition Facts (Per Serving)
It is important to consider this information as approximate and not to use it as definitive health advice.
Allergy Information
Please check ingredients for potential allergens and consult a health professional if in doubt.