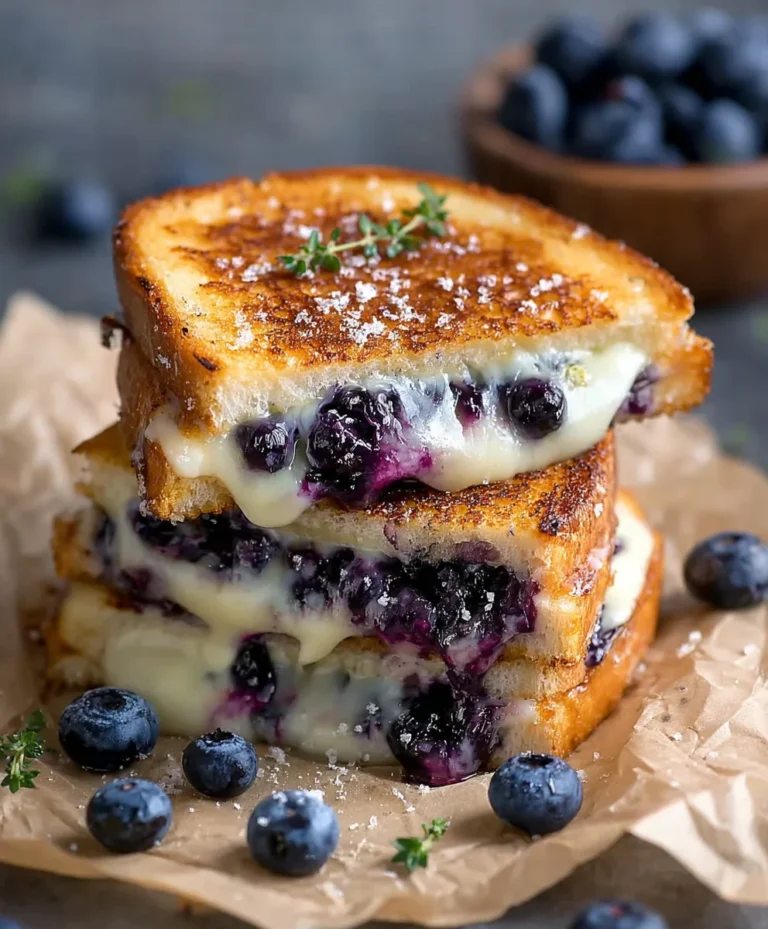
Gourmet Irish Cheese Toastie – The Ultimate Grilled Cheese
The Irish Cheese Toastie is more than just a sandwich; it’s a warm hug on a plate, a nostalgic trip back to childhood, and, quite frankly, one of the most comforting things you can whip up in your kitchen. We all have our go-to comfort foods, and for many, especially those with Irish roots or a fondness for hearty, simple pleasures, the Irish cheese toastie reigns supreme. Why does this seemingly humble creation hold such a special place in our hearts? It’s the perfect marriage of textures and flavors: the crisp, golden exterior giving way to a molten, gooey interior of savory, often sharp, Irish cheese, all sandwiched between two perfectly toasted slices of bread. It’s the epitome of simple elegance, a testament to how a few quality ingredients can create pure culinary magic.
This isn’t just any grilled cheese.
What makes our Irish Cheese Toastie truly special?
It’s the thoughtful selection of ingredients and the subtle nuances in preparation that elevate this beloved dish. We’re going to guide you through creating an Irish cheese toastie that will leave you utterly satisfied, proving that sometimes, the most extraordinary meals are the ones steeped in tradition and made with love.
Irish Cheese Toastie
There’s something incredibly comforting about a perfectly executed cheese toastie. It’s simple, yes, but when you elevate it with the right ingredients and a touch of Irish magic, it transforms into something truly special. Forget those soggy, greasy versions you might have encountered; this Irish Cheese Toastie is a symphony of textures and flavors that will have you reaching for a second (or third!) helping. We’re talking about a golden-brown exterior, a crispy crust giving way to a fluffy, eggy interior, and the glorious, stretchy pull of melted, aged Irish cheddar. It’s the kind of dish that’s perfect for a lazy weekend brunch, a quick and satisfying lunch, or even a late-night indulgence. The secret lies in the quality of your ingredients and a little patience in the cooking process.
Ingredients:
Cooking Instructions
Let’s get started on creating your ultimate Irish Cheese Toastie. The process is straightforward, but paying attention to the details will make all the difference.
Prepare the Bread: First things first, let’s get our bread ready for its transformation. You’ll want to lightly butter one side of each slice of bread. I recommend using softened butter, as it spreads more easily and evenly without tearing the bread. Don’t be shy with the butter; it’s crucial for achieving that beautiful golden-brown, crispy exterior. Ensure the butter covers the entire surface of one side of each slice. This buttered side will be the one that touches the pan. For an extra layer of flavor and richness, you can even consider a light spread of mayonnaise on the unbuttered side, though it’s entirely optional.
Create the Egg Mixture: Now, let’s whip up the flavorful batter that will bind our toastie together and give it that delightful custardy interior. In a shallow bowl or dish, crack your three large eggs. Add the Dijon mustard and Worcestershire sauce. The Dijon mustard adds a gentle tang and helps emulsify the mixture, while the Worcestershire sauce provides a subtle umami depth that complements the cheese beautifully. Whisk these ingredients together vigorously until everything is well combined and slightly frothy. You want a smooth, homogenous mixture.
Assemble the Toasties: It’s time to bring everything together. Take two slices of bread and place them butter-side down on a clean work surface. Generously sprinkle half of your shredded Irish cheddar cheese over the unbuttered side of these two slices. Make sure to distribute the cheese evenly, reaching close to the edges. Then, take another two slices of bread and place them butter-side down on top of the cheese, so the unbuttered sides are facing upwards. These will form the top of your toasties. Now, carefully take the remaining two slices of bread and place them butter-side down on top of the cheesed bread, creating your sandwich base. You should have two open-faced sandwiches at this point, with the unbuttered side facing up.
Dip and Season: This is where the magic really happens. Take one of the open-faced sandwiches and carefully dip the unbuttered side (the side facing upwards) into the egg mixture, ensuring it gets fully coated. Gently press down to help the bread absorb the eggy goodness. You want a good coating, but don’t let it get too soggy. Carefully lift the sandwich and allow any excess egg mixture to drip back into the bowl. Sprinkle half of the remaining shredded cheddar cheese over the egg-coated surface. Then, season with half of the cracked black pepper and half of the chopped fresh chives. Repeat this process with the second open-faced sandwich. The goal here is to have a sandwich base that is coated in egg and topped with cheese, pepper, and chives, ready to be covered.
Grill to Golden Perfection: Heat a large non-stick skillet or griddle over medium-low heat. Once the pan is warm, carefully place your assembled and coated toasties into the skillet, ensuring the buttered side of the bread is on the bottom, touching the pan. Cook for approximately 4-6 minutes per side, or until the bread is a beautiful golden brown and the cheese is completely melted and gooey. You’re looking for that perfect crispness on the outside. It’s important to cook these over medium-low heat; too high, and the bread will burn before the cheese has a chance to melt properly. You can gently press down on the toasties with a spatula occasionally to ensure even cooking and good contact with the pan. Once the first side is perfectly golden and the cheese is starting to melt, carefully flip the toasties using a spatula. Cook the second side for another 4-6 minutes, until equally golden brown and the cheese is wonderfully melted and oozing. You might need to adjust the heat slightly as you go to maintain a consistent golden hue without burning. The aroma that fills your kitchen at this stage is simply divine!
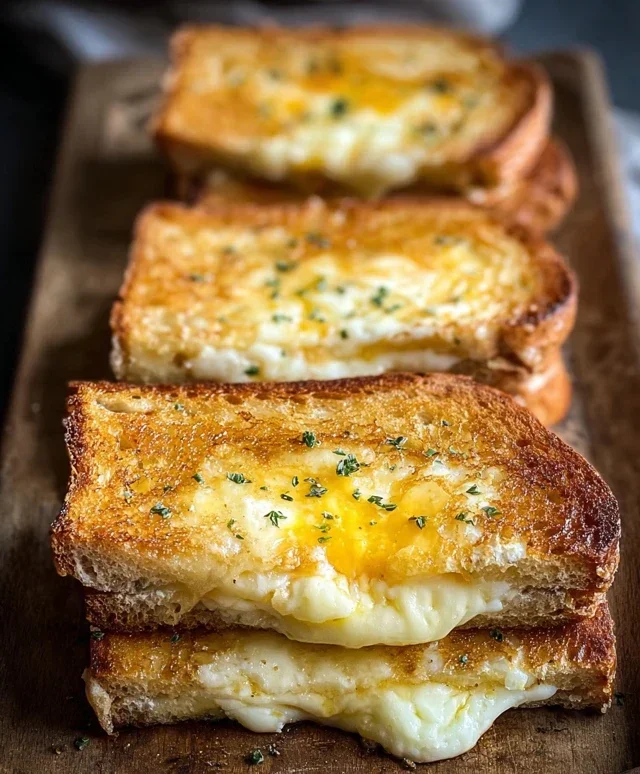
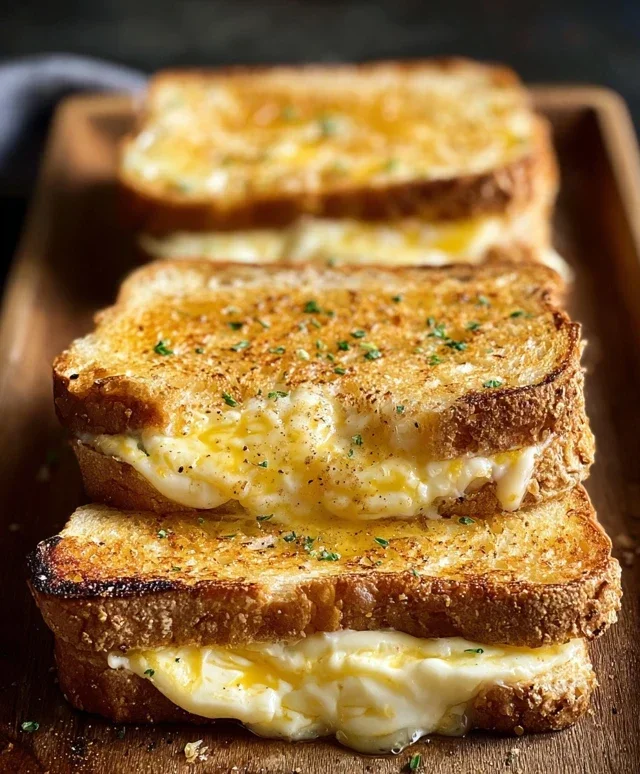
Serve and Enjoy: Once your Irish Cheese Toasties are cooked to perfection, carefully remove them from the skillet. For an extra touch, you can sprinkle a little more fresh chives over the top. Slice them in half, if desired, and serve immediately. The beauty of this dish is its simplicity, allowing the rich flavors of the aged Irish cheddar to shine through. Enjoy the contrast between the crispy, buttery bread and the soft, cheesy, eggy interior. It’s a truly satisfying and delicious experience.
Conclusion:
There you have it – your guide to crafting the ultimate Irish Cheese Toastie! We’ve explored how this simple yet incredibly satisfying sandwich is a testament to the power of quality ingredients and a perfectly executed melt. Its golden, crispy exterior giving way to a gooey, cheesy interior makes it an irresistible comfort food that’s perfect for any occasion. Whether you’re looking for a quick lunch, a warming snack on a chilly evening, or a crowd-pleasing appetizer, the Irish Cheese Toastie truly delivers.
Don’t be afraid to experiment with serving your toastie! It’s fantastic served alongside a hearty bowl of homemade soup, like a creamy tomato or a robust leek and potato. A side of crisp, fresh salad can also provide a lovely counterpoint to the richness. For those who love to get creative in the kitchen, consider variations like adding a sprinkle of chives to the cheese mixture, a thin slice of beef ham or crispy beef bacon, or even a dollop of onion jam for an extra layer of flavour. The beauty of this recipe lies in its adaptability.
I truly hope you’ll give this classic Irish Cheese Toastie a try. It’s a recipe that brings warmth, flavour, and a genuine sense of comfort, proving that sometimes, the simplest things are the most delicious. So grab your bread, your cheese, and get ready to enjoy a truly delightful culinary experience.
Frequently Asked Questions:
What is the best Irish cheese for a toastie?
While many Irish cheeses work wonderfully, a mature Irish Cheddar is a fantastic choice. Its sharpness and excellent melting properties create that signature gooey texture. Other great options include a good Irish Gruyère or a blend of your favourite Irish cheeses.
Can I make an Irish Cheese Toastie ahead of time?
For the absolute best experience, it’s recommended to assemble and cook your Irish Cheese Toastie just before serving to ensure maximum crispiness and melty cheese. However, you can prepare your filling ingredients in advance and assemble quickly when ready.
What bread is best for an Irish Cheese Toastie?
A sturdy, medium-sliced white or brown bread works beautifully. The key is a bread that can hold up to the heat and the cheese without becoming too soggy. A good sourdough can also add a lovely tang.
Irish Cheese Toastie
A savory and satisfying grilled cheese sandwich with a distinctive Irish cheddar flavor.
Ingredients
-
6 slices bread (brown, potato, white, or multi-grain)
-
2 tablespoons butter, softened
-
3 large eggs
-
2 teaspoons Dijon mustard
-
2 teaspoons Worcestershire sauce
-
7-8 ounces aged Irish cheddar, shredded
-
1/2 teaspoon cracked black pepper
-
1 tablespoon fresh chives, chopped
Instructions
-
Step 1
In a shallow dish, whisk together the eggs, Dijon mustard, and Worcestershire sauce until well combined. -
Step 2
Butter one side of each slice of bread. Place three of the bread slices, butter-side down, into the egg mixture and let them soak for about 30 seconds per side. -
Step 3
Heat a non-stick skillet or griddle over medium heat. Place the soaked bread slices into the skillet. -
Step 4
Generously sprinkle the shredded Irish cheddar over the bread in the skillet. Top with the remaining three slices of bread, unsoaked side up. -
Step 5
Cook for about 4-5 minutes per side, or until the bread is golden brown and toasted, and the cheese is melted and gooey. Press down gently with a spatula to ensure even cooking. -
Step 6
Remove from the skillet, sprinkle with cracked black pepper and chopped chives. Slice and serve immediately.
Important Information
Nutrition Facts (Per Serving)
It is important to consider this information as approximate and not to use it as definitive health advice.
Allergy Information
Please check ingredients for potential allergens and consult a health professional if in doubt.