Perfect Grilled Pizza Recipe- Easy Delicious Results
How to Make the Perfect Grilled Pizza is an adventure that promises a smoky, crispy, and utterly delicious reward. Forget the soggy bottoms and rubbery crusts of less fortunate pizza experiences! There’s something undeniably magical about pizza kissed by flame, and mastering the art of the perfect grilled pizza unlocks a whole new level of home-cooked bliss. The allure lies in its unique textural contrast: that satisfying char on the crust giving way to a tender, airy interior, all while the toppings meld beautifully under the heat. It’s a dish that transforms a simple meal into a celebratory feast, perfect for backyard gatherings or a cozy weeknight treat. Get ready to impress yourself and everyone you share it with!
Why Grilled Pizza Reigns Supreme
The Smoky Char and Crispy Perfection
The secret to truly exceptional grilled pizza isn’t just about tossing dough on a hot surface; it’s about coaxing out that incredible smoky flavor and achieving a perfectly crisp yet chewy crust. When you nail it, every bite is a symphony of textures and tastes that you just can’t replicate in a conventional oven. It’s simpler than you think, and the results are spectacular. Let’s get grilling!
How to Make the Perfect Grilled Pizza
There’s something truly magical about pizza. It’s a universal comfort food, a crowd-pleaser, and a canvas for culinary creativity. While oven-baked pizzas are fantastic, taking your pizza game outdoors to the grill unlocks a whole new level of flavor and texture. The intense heat of the grill creates a wonderfully crispy crust with delightful smoky undertones that you just can’t replicate indoors. Forget soggy bottoms and unevenly cooked toppings – with a few simple techniques, you can achieve pizza perfection right on your barbecue. This guide will walk you through the process, from prepping your ingredients to pulling a golden, bubbling masterpiece off the grill.
Ingredients:
Getting Started: Preparing Your Grill and Dough
The key to successful grilled pizza lies in preparation. First, ensure your grill is clean and ready to go. Preheat your grill to a medium-high heat, aiming for around 450-500°F (230-260°C). If you have a two-zone grill setup, this is ideal. You’ll want one side with direct heat and the other side with indirect heat. This allows you to cook the crust quickly and then move the pizza to the cooler side if the toppings are cooking too fast.
While the grill heats up, it’s time to work with your pizza dough. If your dough is straight from the refrigerator, let it sit at room temperature for about 30 minutes to an hour. This makes it much easier to stretch without tearing. Lightly dust your work surface and your hands with cornmeal or flour. This prevents sticking and helps create a crispier crust. Gently stretch the dough into your desired pizza shape. I prefer a rustic, slightly irregular oval or circle for grilled pizza, but you can aim for perfection if you like. Don’t overwork the dough; you want it to be pliable, not tough. Aim for a thickness of about 1/4 inch.
Grilling the Crust
This is where the magic happens. Once your grill is preheated, lightly brush one side of your stretched pizza dough with olive oil. Carefully place the dough, oiled-side down, directly onto the hot grill grates. You should hear a satisfying sizzle!
This first grilling phase is crucial for developing that amazing crust. Close the grill lid and let the dough cook for about 2-4 minutes, or until the underside is golden brown and has developed nice grill marks. Keep a close eye on it; things can cook quickly on a hot grill. You can peek underneath using tongs to check for doneness. The goal here is to create a sturdy base that can hold your toppings without becoming soggy.
Assembling Your Pizza on the Grill
Once one side of the crust is nicely grilled, it’s time to flip it. Carefully use your spatula or tongs to flip the dough over. Now, working quickly, you’ll add your toppings to the grilled side.
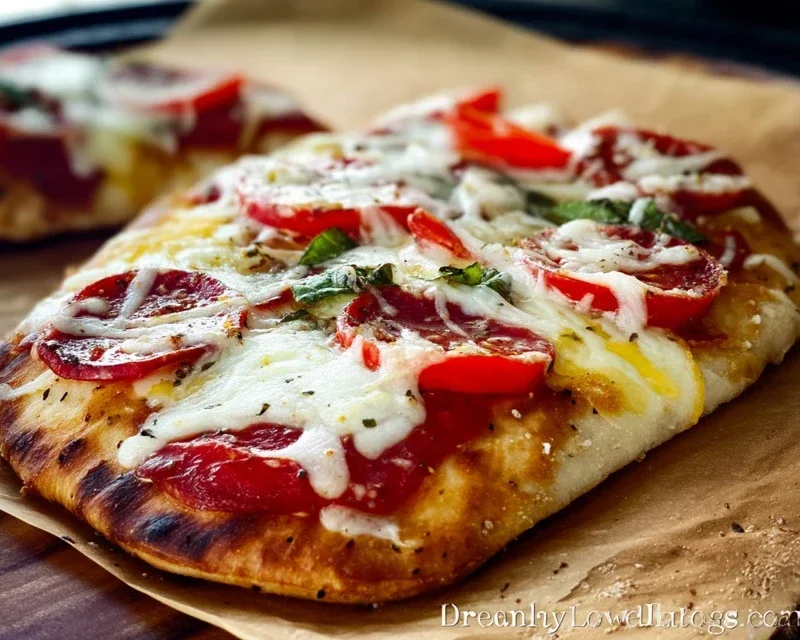
Brush the uncooked side of the dough lightly with olive oil. Spread your pizza sauce evenly over the grilled crust, leaving a small border for the crust. Scatter the mozzarella cheese and Parmesan cheese over the sauce. Then, add your chosen toppings. Remember, less is often more with grilled pizza to ensure even cooking. Don’t overload it, or your pizza might not cook through properly.
Finishing the Pizza on Indirect Heat
Once your pizza is assembled, it’s time to finish cooking. If you have a two-zone grill, move the pizza to the cooler, indirect heat side. Close the grill lid and let it cook for another 5-8 minutes, or until the cheese is melted and bubbly, and the crust is golden brown and cooked through.
If you only have a single-zone grill, you can achieve indirect heat by turning off the burner directly under the pizza, or by moving the pizza to the side of the grill where there are no active burners. Alternatively, if your toppings are cooking too quickly on direct heat, you can tent the pizza loosely with aluminum foil to shield it while the cheese melts. The key is to allow the cheese to melt and the crust to crisp up without burning the toppings. You’re looking for those beautiful, melted cheese bubbles and a crust that has a good crunch.
Serving Your Masterpiece
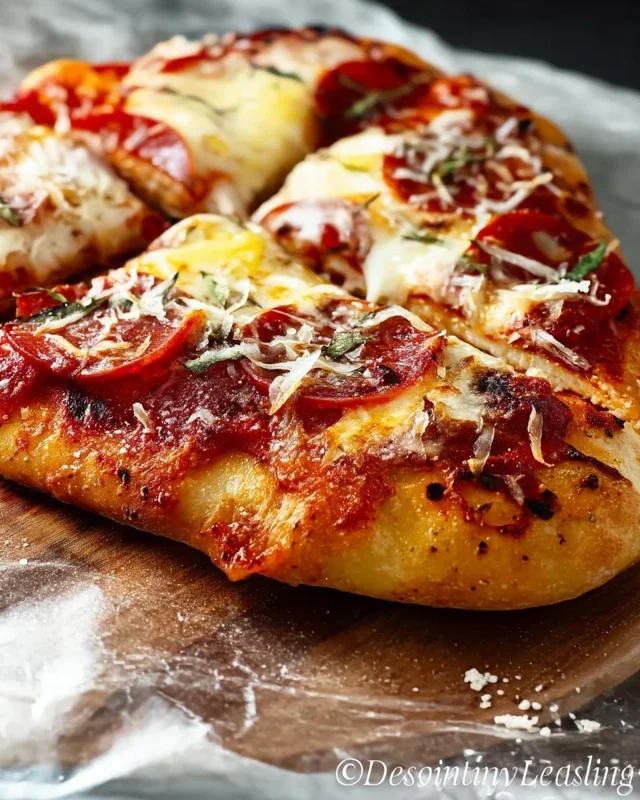
Once your grilled pizza is perfectly cooked, carefully slide it off the grill onto a cutting board. Let it rest for just a minute or two before slicing. This allows the cheese to set slightly, making it easier to cut. Slice it up and serve immediately. The smoky flavor, the crispy crust, and the perfectly melted toppings make for an unforgettable pizza experience. Enjoy the fruits of your grilling labor! This method is simple, fun, and incredibly rewarding, especially on a beautiful day. You’ll be surprised at how easy it is to create restaurant-quality pizza in your own backyard.
Conclusion:
You’ve now got the roadmap to crafting the most delicious and impressive grilled pizza right in your own backyard! This method is fantastic because it delivers a wonderfully crispy, smoky crust that you just can’t achieve in a conventional oven, all while keeping your kitchen cool. The key is proper dough preparation and managin extractg your grill’s heat effectively. Don’t be afraid to get creative with your toppings!
Imagin extracte serving these glorious grilled pizzas at your next barbecue or casual get-together. They’re perfect alongside a fresh green salad or a simple bowl of olives. For variations, consider a classic Margherita with fresh mozzarella, basil, and tomatoes, or go bold with a spicy sausage and roasted pepper combination. You could even try a dessert pizza with grilled peaches and a mascarpone drizzle!
I truly encourage you to give this a try. The results are incredibly rewarding, and the process itself is a lot of fun. Experimenting with different flavor profiles is part of the joy of making your own perfect grilled pizza. So fire up that grill and get ready to impress yourself and your loved ones with a truly exceptional meal.
Frequently Asked Questions:
What is the best type of dough for grilled pizza?
A simple, slightly wetter dough works best for grilled pizza. It allows for easier handling on the grill and results in a wonderfully chewy yet crispy crust. A dough with a good hydration level (around 65-70%) is ideal.
Can I prepare the dough in advance?
Absolutely! You can prepare your pizza dough up to 2-3 days in advance and let it ferment in the refrigerator. This slow fermentation develops even more flavor and makes the dough easier to stretch and handle. Just remember to bring it to room temperature for about an hour before grilling.
How do I prevent the dough from sticking to the grill grates?
A well-oiled grill is crucial! Make sure your grates are clean and thoroughly oiled before placing the dough on them. Brushing the dough itself with a light coating of olive oil also helps create a barrier and prevents sticking, ensuring a beautiful char and easy release.
The Perfect Grilled Pizza
Master the art of making delicious pizza on the grill with this simple recipe. Achieve a crispy crust and perfectly melted toppings.
Ingredients
-
1 ball pizza dough
-
1/2 cup tomato sauce
-
2 cups shredded mozzarella cheese
-
1/4 cup sliced pepperoni
-
1 tablespoon olive oil
-
1/4 cup sliced mushrooms
-
1/4 cup chopped bell peppers
Instructions
-
Step 1
Preheat your grill to medium-high heat. If using a charcoal grill, aim for coals that are glowing red. If using a gas grill, set burners to medium-high and close the lid for about 10-15 minutes. -
Step 2
Lightly flour a clean surface and stretch or roll out your pizza dough to your desired thickness and shape. Brush one side of the dough with olive oil. -
Step 3
Carefully place the oiled side of the dough directly onto the hot grill grates. Grill for 2-4 minutes, or until the bottom is golden brown and slightly puffed. Watch closely to prevent burning. -
Step 4
Flip the dough over using a spatula. Quickly spread the tomato sauce over the grilled side, leaving a small border for the crust. Top with mozzarella cheese, pepperoni, mushrooms, and bell peppers. -
Step 5
Close the grill lid and cook for another 5-8 minutes, or until the cheese is melted and bubbly and the crust is golden brown and cooked through. Rotate the pizza if necessary for even cooking. -
Step 6
Carefully remove the pizza from the grill using a pizza peel or large spatula. Let it cool slightly before slicing and serving.
Important Information
Nutrition Facts (Per Serving)
It is important to consider this information as approximate and not to use it as definitive health advice.
Allergy Information
Please check ingredients for potential allergens and consult a health professional if in doubt.