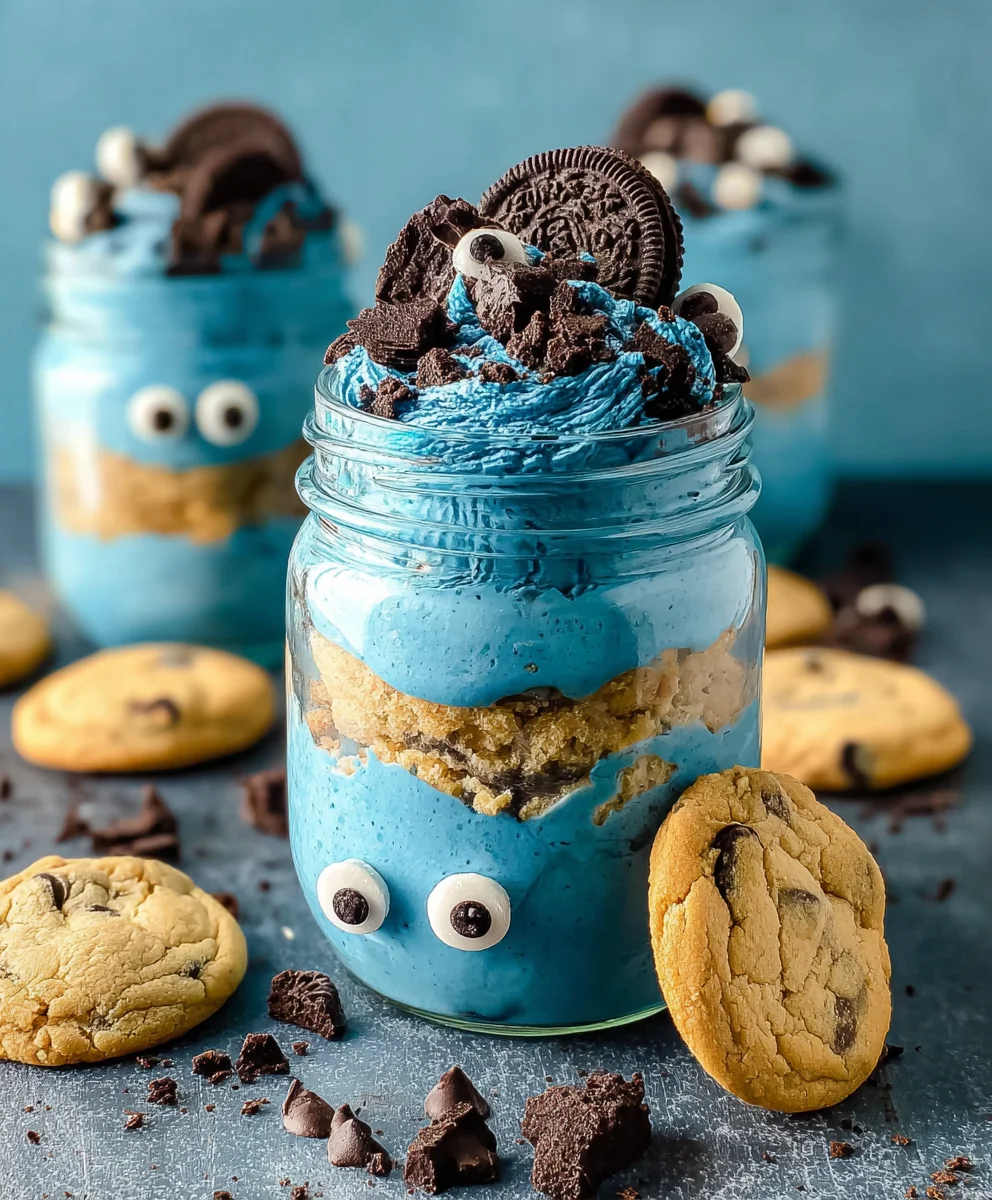
Cookie Monster Cake Jars-Fun Treat
Cookie Monster Cake Jars are more than just a dessert; they’re a delightful explosion of vibrant blue hues and irresistible cookie goodness, all packed into a conveniently portable jar. Imagin extracte layers of fluffy vanilla cake, studded with chocolate chips, swirled with creamy, sweet frosting, and topped with a generous scattering of crum extractbled cookies – that’s the magic of these whimsical treats. It’s no wonder they’ve become a sensation, capturing the hearts (and taste buds!) of people of all ages. Their inherent fun factor makes them perfect for parties, a special afternoon pick-me-up, or even a unique dessert to impress your guests. What truly sets these Cookie Monster Cake Jars apart is their customizable nature; you can play with different rum extractkie crumbles, frosting flavors, and even add edible glitter for an extra touch of sparkle. Get ready to dive into a world of deliciousness with this easy-to-follow recipe for your very own Cookie Monster Cake Jars!
Ingredients:
- 15 oz box white or vanilla cake mix
- Ingredients called for on cake mix box (typically eggs, oil, and water)
- 10 Oreos, chopped (divided)
- ½ cup (1 stick) unsalted butter, room temperature
- ½ cup vegetable shortening
- 3 cups powdered sugar
- 2-3 tablespoons milk or coffee creamer
- 1 teaspoon vanilla extract
- 1 drop electric blue Americolor gel color
- 2 drops royal blue Chef Masters gel color
- 8-10 Oreos, chopped
- 8-10 chocolate chip cookies, chopped
- 8 candy eyes
- 2 chocolate chip cookies, cut in half
- Blue ribbon (optional, for decorating jars)
Baking the Cookie Monster Cake
Preparing the Cake Batter
First things first, let’s get our cake layers ready. Preheat your oven to the temperature recommended on your white or vanilla cake mix box. Grease and flour your cake pans as instructed on the box. In a large mixing bowl, combine the cake mix with the wet ingredients – typically eggs, oil, and water – as specified on the packagin extractg. Mix everything until it’s smooth and well combined, making sure there are no dry pockets of cake mix. For an extra delicious cake, I like to add an extra splash of milk or a bit of coffee creamer if the batter seems a little thick, giving it a richer texture.
Baking and Cooling the Cake
Once your batter is ready, pour it evenly into the prepared cake pans. Bake for the time recommended on the cake mix box, or until a toothpick inserted into the center comes out clean. This is your indicator that the cake is perfectly baked through. After baking, let the cakes cool in their pans for about 10-15 minutes before carefully inverting them onto a wire rack to cool completely. It’s crucial that the cake layers are fully cooled before you start assembling your Cookie Monster Cake Jars, otherwise, the frosting will melt and you’ll end up with a messy situation.
Making the Cookie Monster Frosting
Creaming the Butter and Shortening
Now for the star of the show – the vibrant blue frosting! In a large bowl, cream together the ½ cup of room temperature unsalted butter and the ½ cup of vegetable shortening. Using room temperature butter is key here; it should be soft enough to yield to gentle pressure but not so soft that it’s melted. Cream these together using an electric mixer on medium speed until the mixture is light and fluffy. This process incorporates air, which will make your frosting wonderfully smooth and spreadable.
Adding Powdered Sugar and Flavor
Gradually add the 3 cups of powdered sugar to the creamed butter and shortening, about a cup at a time, mixing on low speed until each addition is incorporated. Once all the powdered sugar is mixed in, increase the mixer speed to medium-high and beat for another 2-3 minutes until the frosting is light and airy. Now, drizzle in your 1 teaspoon of vanilla extract. Next, it’s time to add the magic color! Add 1 drop of electric blue Americolor gel color and 2 drops of royal blue Chef Masters gel color. Start with these amounts, and if you want a deeper, more intense Cookie Monster blue, you can carefully add another drop of each color, mixing thoroughly after each addition until you achieve your desired shade.
Achieving the Perfect Consistency
The frosting might be quite thick at this stage. To get it to a perfect spreading consistency, add your milk or coffee creamer, 1 tablespoon at a time, mixing well after each addition. You’re looking for a consistency that’s smooth and spreadable but not too runny. If it becomes too thin, you can always add a little more powdered sugar. You want it thick enough to hold its shape but easy enough to pipe or spread.
Assembling the Cookie Monster Cake Jars
Layering the Cake and Crum extractbs
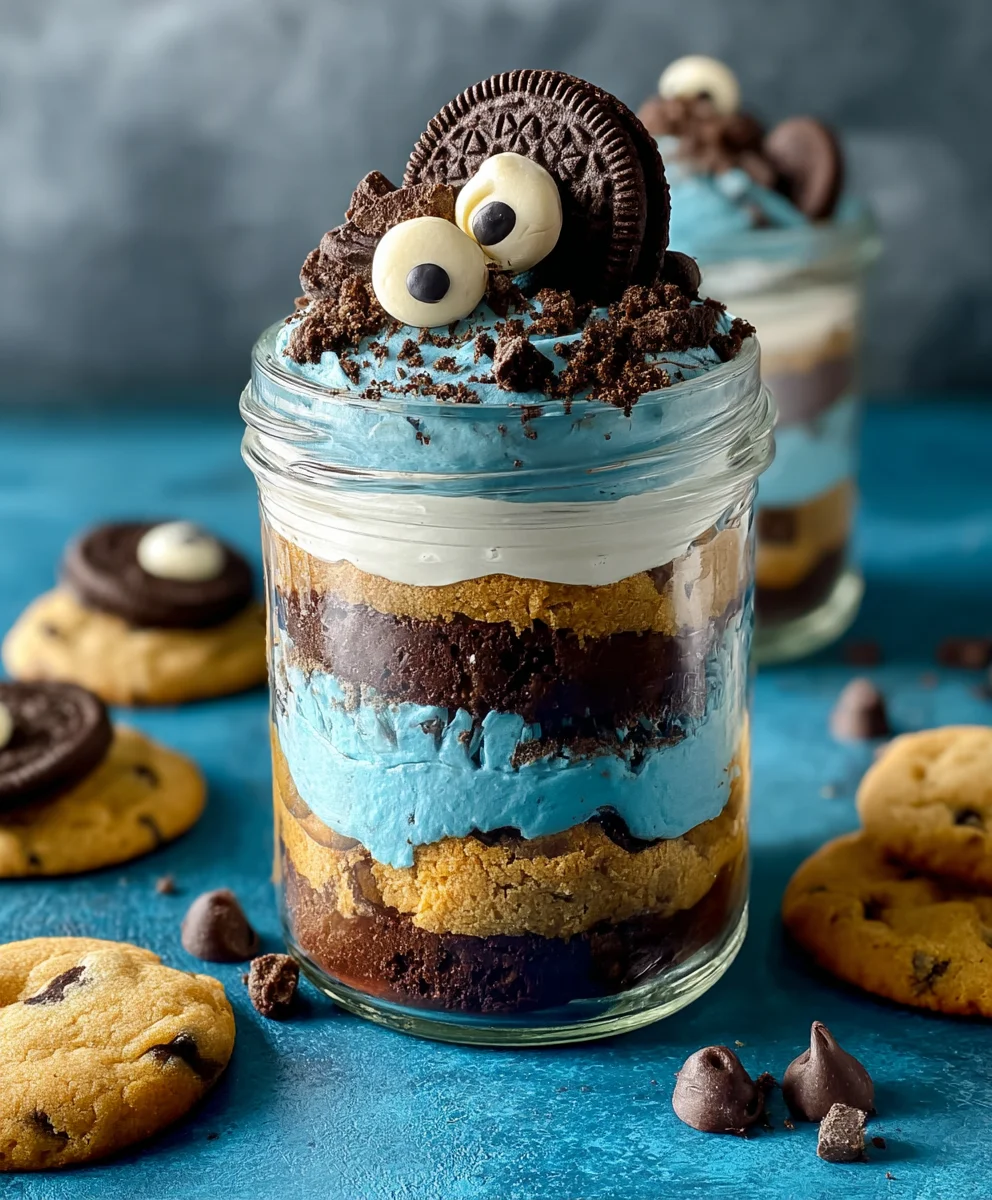
Grab your jars! You can use mason jars, small glass containers, or even plastic cups. Strum extract by crumbling some of your cooled cake into the bottom of each jar. You can do this by hand or by lightly pressing it down with a fork. Next, add a layer of your delicious Cookie Monster frosting. Then, sprinkle a generous amount of the chopped Oreos (remember we reserved some earlier!). This is where we’re creating those delightful textures and flavors reminiscent of the beloved character.
Adding More Frosting and Cookie Chunks
Continue layering! Add anrum extracter layer of crumbled cake, followed by another generous dollop of the vibrant blue frosting. Now, add the chopped chocolate chip cookies and the remaining chopped Oreos to the mix. This combination of Oreos and chocolate chip cookies is what really elevates the “Cookie Monster” theme, giving it that signature crunchy goodness. Don’t be shy with the cookie bits; the more, the merrier!
The Final Touches
Top off each jar with a final swirl of the Cookie Monster frosting. This is your canvas for the final details. Carefully place two candy eyes onto the frosting to give your Cookie Monster Cake Jars their iconic face. For an extra touch of whimsy, you can strategically place a half chocolate chip cookie near the top of the frosting, as if the monster is peeking out. If you’re feeling extra festive and want to present them beautifully, tie a blue ribbon around the rim of each jar for a charming presentation. These are perfect for parties, gifts, or just a special treat for yourself!
Conclusion:
And there you have it – your very own delicious batch of Cookie Monster Cake Jars! We hope you enjoyed this fun and easy recipe. These delightful little treats are perfect for any occasion, from birthday parties and potlucks to simply satisfying a sweet craving. The combination of soft cake, creamy frosting, and irresistible cookie crum extractbles is truly a winner. Feel free to get creative with your toppings and truly make them your own!
To serve these delightful Cookie Monster Cake Jars, simply hand them out chilled from the refrigerator. They’re already perfectly portioned and ready to go! For a bit of extra flair, you can tie a ribbon around the jar or add a personalized tag.
Looking for variations? Absolutely! You can swap out the blue food coloring for a different fun shade, or experiment with different types of cookies like chocolate chip or peanut butter. Consider adding a layer of cookie dough frosting or even some mini M&Ms for extra texture and flavor.
Don’t be afraid to experiment and have fun in the kitchen. Baking should be a joyful experience, and the Cookie Monster Cake Jars are sure to bring smiles to everyone who tries them. We encourage you to make these again and again, perhaps even making them a regular feature for family dessert nights!
Frequently Asked Questions:
Q: Can I make the cake layers ahead of time?
A: Yes, you absolutely can! The cake layers can be baked up to two days in advance and stored in an airtight container at room temperature. Once cooled completely, wrap them well to prevent them from drying out. This will save you time when assembling your Cookie Monster Cake Jars.
Q: How long do Cookie Monster Cake Jars last in the refrigerator?
A: These delightful Cookie Monster Cake Jars will stay fresh in the refrigerator for up to 3-4 days. Make sure they are senon-alcoholic aled tightly in their jars to maintain their moisture and flavor.
Q: Can I use store-bought cake mix for this recipe?
A: Of course! If you’re looking for an even quicker option, a good quality vanilla or yellow cake mix will work wonderfully as a base for your Cookie Monster Cake Jars. Just follow the package instructions for preparation.
Cookie Monster Cake Jars-Fun Treat
Fun and festive Cookie Monster themed cake jars layered with cake, frosting, and cookie crumbles.
Ingredients
-
15 oz box white or vanilla cake mix
-
Ingredients called for on cake mix box (typically eggs, oil, and water)
-
10 Oreos, chopped (divided)
-
½ cup (1 stick) unsalted butter, room temperature
-
½ cup vegetable shortening
-
3 cups powdered sugar
-
2-3 tablespoons milk or coffee creamer
-
1 teaspoon vanilla extract
-
1 drop electric blue Americolor gel color
-
2 drops royal blue Chef Masters gel color
-
8-10 Oreos, chopped
-
8-10 chocolate chip cookies, chopped
-
8 candy eyes
-
2 chocolate chip cookies, cut in half
-
Blue ribbon (optional, for decorating jars)
Instructions
-
Step 1
Prepare the cake batter according to the cake mix box instructions. Pour into greased and floured cake pans. Bake according to box directions or until a toothpick comes out clean. Cool completely. -
Step 2
Make the frosting: Cream together room temperature butter and shortening until light and fluffy. Gradually add powdered sugar, then vanilla extract. -
Step 3
Add food coloring: Mix in 1 drop of electric blue and 2 drops of royal blue gel color until desired shade is achieved. Adjust with more color if needed. -
Step 4
Adjust frosting consistency by adding milk or coffee creamer, 1 tablespoon at a time, until smooth and spreadable. -
Step 5
Assemble jars: Crumble cooled cake into the bottom of each jar. Add a layer of frosting, followed by chopped Oreos. -
Step 6
Continue layering with crumbled cake, frosting, chopped chocolate chip cookies, and remaining chopped Oreos. -
Step 7
Top each jar with a final swirl of frosting. Decorate with candy eyes and half chocolate chip cookies. Optionally tie with a blue ribbon.
Important Information
Nutrition Facts (Per Serving)
It is important to consider this information as approximate and not to use it as definitive health advice.
Allergy Information
Please check ingredients for potential allergens and consult a health professional if in doubt.