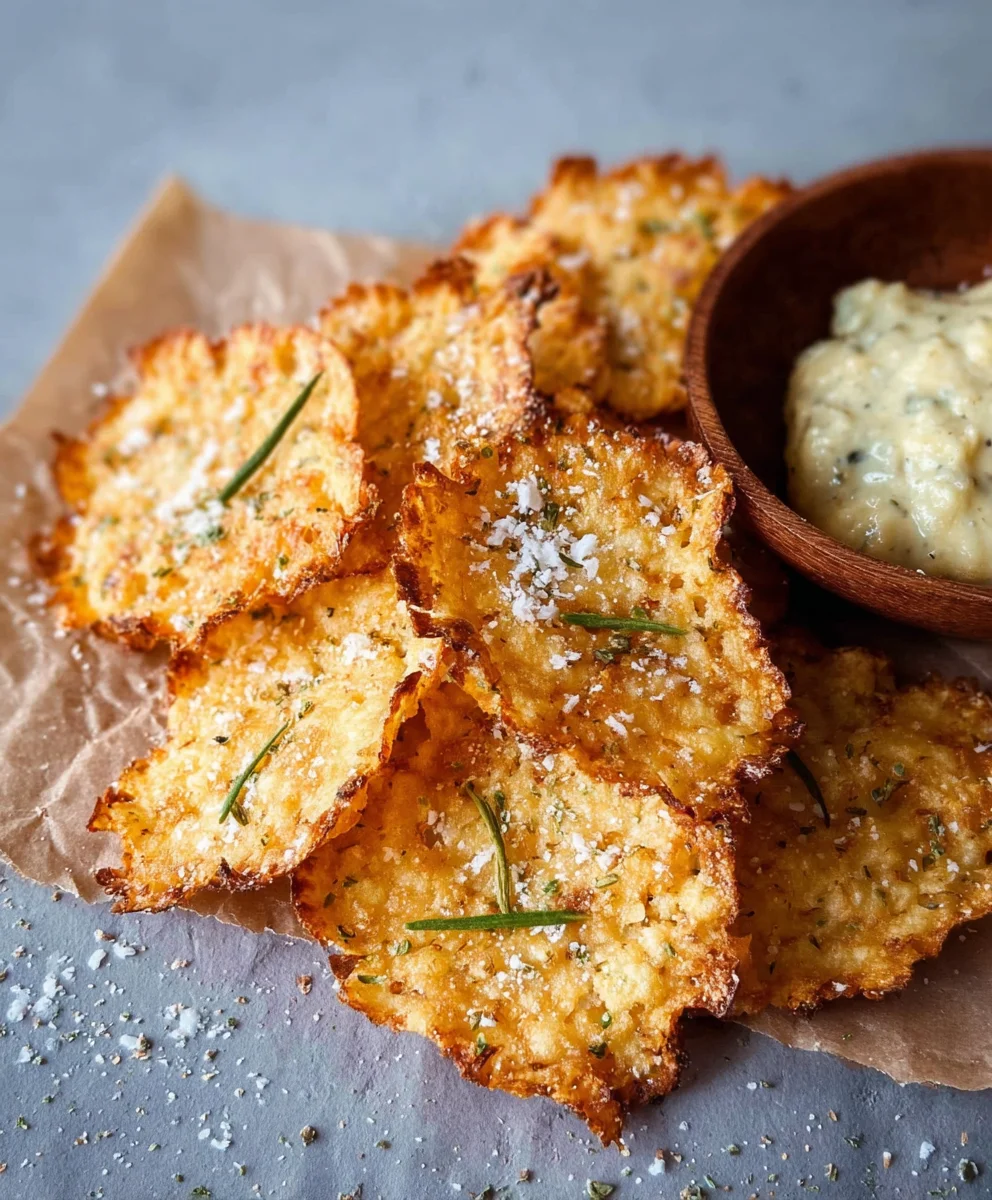
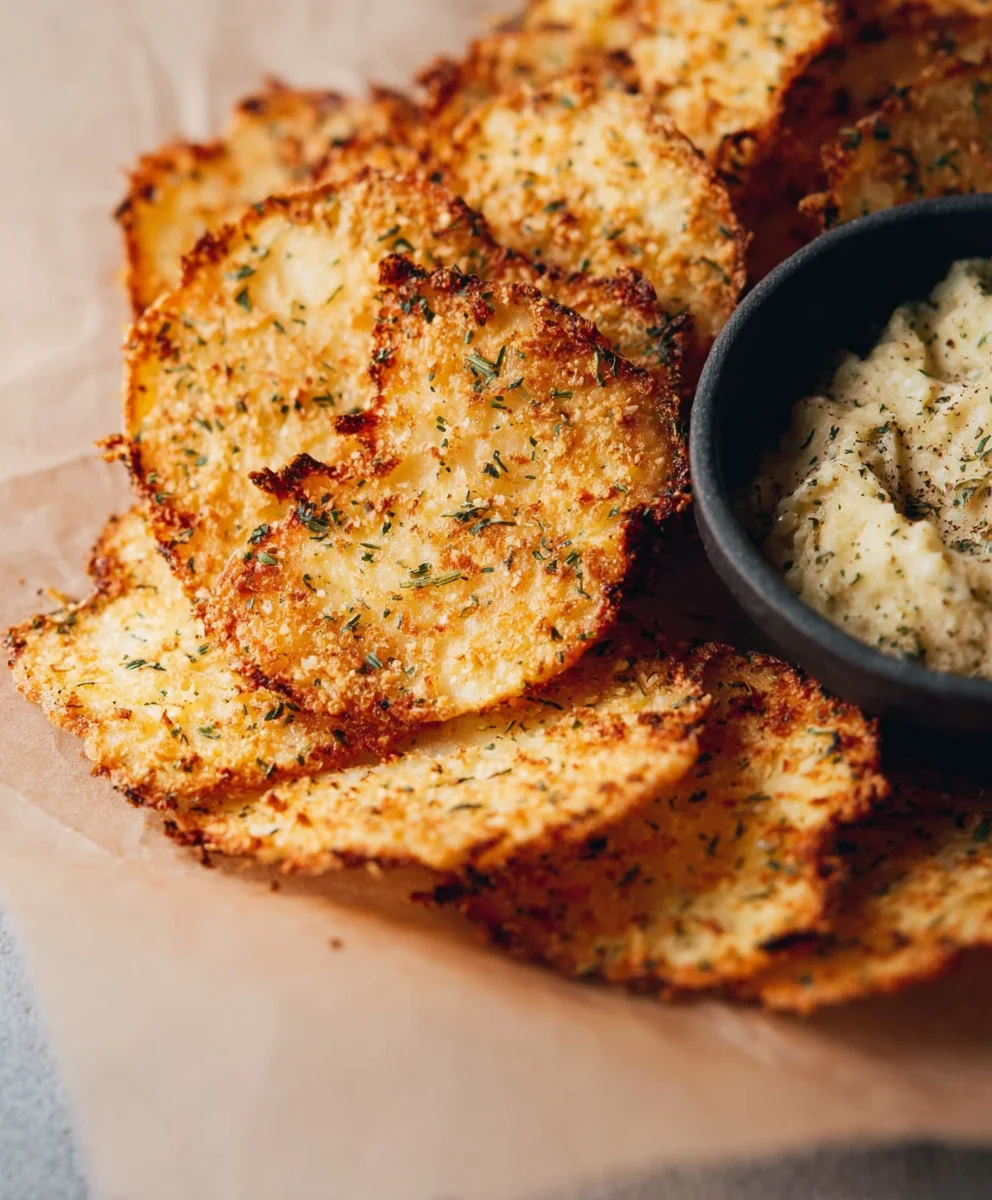
Crispy Cottage Cheese Chips- Easy Healthy Snack
Crispy Cottage Cheese Chips are a revelation for anyone seeking a delightfully crunchy snack that’s also surprisingly satisfying and protein-packed. Forget those bland, store-bought alternatives; these homemade wonders offer a textural adventure with a subtle tang that keeps you reaching for more. What’s not to love about a snack that’s baked to a perfect crisp, bursting with flavor, and can be customized to your heart’s content? The magic of these Crispy Cottage Cheese Chips lies in their simplicity and versatility. They transform humble cottage cheese into an addictive treat, making them ideal for dipping, crum extractbling over salads, or simply enjoying on their own. Get ready to discover your new go-to snack that’s as healthy as it is irresistible!
Ingredients:
- 1 cup cottage cheese (small curds, drained well)
- ¼ teaspoon garlic powder
- ¼ teaspoon onion powder
- ½ teaspoon dried herbs (optional, such as thyme, parsley, or Italian blend)
- Salt to taste
- Freshly ground black pepper to taste
- Olive oil spray
Preparing Your Crispy Cottage Cheese Chips
The journey to creating these delightfully crispy cottage cheese chips begin extracts with a few simple preparations. The key to achieving the perfect crunch lies in how you handle the cottage cheese. For this recipe, we are using small curd cottage cheese. It’s absolutely crucial to drain it as thoroughly as possible. You can do this by placing the cottage cheese in a fine-mesh sieve set over a bowl. Let it sit for at least 15-30 minutes, gently pressing down occasionally with a spoon to encourage more liquid to escape. The drier the cottage cheese, the crispier your chips will be. If you skip this step, you’ll end up with a softer, more bread-like texture, which is also delicious, but not quite the crispy chip experience we’re aiming for.
Once your cottage cheese is well-drained, transfer it to a medium-sized mixing bowl. Now it’s time to add the flavor. Sprinkle in the garlic powder and onion powder. These two staples provide a savory base that really elevates the humble cottage cheese. If you’re using dried herbs, this is the moment to add them. A little bit of dried thyme or parsley can add a lovely aromatic note, but feel free to experiment with other herbs you enjoy. For a more robust flavor, an Italian herb blend works wonders. Season generously with salt and freshly ground black pepper. Remember that cottage cheese can sometimes be a bit bland on its own, so don’t be shy with the seasoning.
Now, you need to mix everything together thoroughly. Use a fork or a spoon to break down the curds slightly and ensure all the seasonings are evenly distributed. You want to create a relatively smooth, paste-like consistency. It won’t be perfectly smooth like yogurt, but aim to get rid of any large clumps of cottage cheese and distribute the spices throughout. This mixture will be the foundation of your chips, so taking a moment to ensure it’s well-combined is important for uniform flavor and texture in every bite.
Shaping and Baking for Ultimate Crispiness
This is where the magic happens and your flavor-packed cottage cheese mixture transforms into irresistible chips. Preheat your oven to 375°F (190°C). It’s essential to have your oven at the correct temperature before you start shaping the chips to ensure even cooking and maximum crispiness.
Next, prepare a baking sheet. Line a large baking sheet with parchment paper. This will prevent the chips from sticking and make cleanup a breeze. If you don’t have parchment paper, you can lightly grease the baking sheet, but parchment paper is highly recommended for ease of use and best results.
Now, it’s time to shape your chips. You can do this in a couple of ways. The easiest method is to use a small cookie scoop or a tablespoon to drop small portions of the cottage cheese mixture onto the prepared baking sheet. Aim for dollops that are about 1 to 1.5 inches in diameter. Leave some space between each dollop, as they will spread slightly as they bake. For a flatter, more chip-like appearance, you can gently flatten each dollop with the back of a spoon or your fingertip, creating thin rounds. Alternatively, if you want more uniform shapes and slightly thicker chips, you can spread the mixture thinly onto the parchment paper using an offset spatula or the back of a spoon, and then score it into squares or rectangles before baking. However, for the classic crispy chip experience, the dollop method is often the most straightforward and effective.
Once your chips are shaped and spaced out on the baking sheet, it’s time for the crucial step: a light coating of olive oil spray. Lightly mist each dollop or flattened chip with olive oil spray. This oil is key to achieving that golden-brown color and satisfying crispiness. Don’t drench them, just a quick, even spray is all you need.
Now, carefully place the baking sheet into your preheated oven. Bake for approximately 20-25 minutes. The exact baking time will depend on your oven and the thickness of your chips. Keep a close eye on them during the last 10 minutes of baking. You’re looking for them to turn a beautiful golden brown around the edges and appear set and firm. They should feel dry to the touch. If some are browning faster than others, you can carefully rotate the baking sheet halfway through the baking time.
Cooling and Enjoying Your Creation
After the baking time is up, carefully remove the baking sheet from the oven. The chips might still feel slightly soft in the center when they first come out, but they will continue to crisp up as they cool. Let them cool on the baking sheet for about 5-10 minutes. This initial cooling period allows them to firm up before you attempt to remove them.
Once they’ve cooled slightly, you can carefully transfer the chips to a wire rack to cool completely. This is where the final crisping happens. Cooling them on a wire rack allows air to circulate around the chips, preventing any moisture from getting trapped underneath and making them soggy. As they cool, you’ll notice them becoming even more brittle and crisp. Listen for the satisfying crackle!
Your crispy cottage cheese chips are now ready to be enjoyed. They are fantastic on their own as a light snack, or you can serve them with your favorite dips, like salsa, guacamole, or a creamy yogurt-based dip. They also make a great crunchy topping for salads or soups. Store any leftovers in an airtight container at room temperature. While they are best enjoyed fresh, they can typically last for a few days if stored properly, although their crispiness might diminish slightly over time.
Conclusion:
There you have it – the simple yet incredibly satisfying recipe for Crispy Cottage Cheese Chips! We’ve explored how this surprisingly versatile ingredient can transform into a healthy, dippable, and crunchy snack that’s leagues above many store-bought options. Whether you’re looking for a gluten-free alternative, a protein boost, or just a delicious way to use up cottage cheese, these chips are a winner. They’re perfect for movie nights, as a base for mini pizzas, or simply enjoyed on their own. Experiment with different seasonings to make them your own – a sprinkle of chili powder and garlic salt, or some everything bagel seasoning, can take them to a whole new level!
Don’t be afraid to get creative with your dipping sauces too! Hummus, salsa, guacamole, or a Greek yogurt-based dip all pair wonderfully with the subtle tang of the Crispy Cottage Cheese Chips. I encourage you to give this recipe a try; you might just find your new favorite go-to snack. It’s a testament to how delicious healthy eating can be with a little imagin extractation.
Frequently Asked Questions:
Can I make these chips ahead of time?
Yes, absolutely! Crispy Cottage Cheese Chips are best when stored in an airtight container at room temperature once completely cooled. They tend to stay crispy for a couple of days, though they are undeniably at their peak crunchiness on the day they are made.
What if my chips aren’t getting crispy?
Ensuring your cottage cheese is well-drained is crucial for crispiness. Also, make sure your oven is preheated properly and the baking sheet is not overcrowded. If they still seem a bit soft, try baking them for an additional 5-10 minutes, keeping a close eye to prevent burning.
Can I use a different type of cheese?
While this recipe is specifically designed for cottage cheese to achieve its unique texture and flavor profile, you could experiment with ricotta for a slightly different, richer outcome. However, the “Crispy Cottage Cheese Chips” moniker wouldn’t quite apply then, and the texture might vary.
Crispy Cottage Cheese Chips
An easy and healthy snack recipe for making crispy cottage cheese chips with simple seasonings and olive oil spray.
Ingredients
-
1 cup cottage cheese (small curds, drained well)
-
1/4 teaspoon garlic powder
-
1/4 teaspoon onion powder
-
1/2 teaspoon dried herbs (optional, such as thyme, parsley, or Italian blend)
-
Salt to taste
-
Freshly ground black pepper to taste
-
Olive oil spray
Instructions
-
Step 1
Drain cottage cheese thoroughly in a fine-mesh sieve for at least 15-30 minutes to ensure crispiness. Transfer to a mixing bowl. -
Step 2
Add garlic powder, onion powder, dried herbs (if using), salt, and pepper to the drained cottage cheese. Mix well to create a smooth, paste-like consistency. -
Step 3
Preheat oven to 375°F (190°C). Line a baking sheet with parchment paper. -
Step 4
Drop small portions (about 1-1.5 inches) of the cottage cheese mixture onto the prepared baking sheet, leaving space between them. Lightly flatten each dollop with the back of a spoon. -
Step 5
Lightly mist each chip with olive oil spray. Bake for 20-25 minutes, or until golden brown around the edges and firm. Rotate baking sheet halfway through if needed. -
Step 6
Let cool on the baking sheet for 5-10 minutes, then transfer to a wire rack to cool completely and crisp up.
Important Information
Nutrition Facts (Per Serving)
It is important to consider this information as approximate and not to use it as definitive health advice.
Allergy Information
Please check ingredients for potential allergens and consult a health professional if in doubt.