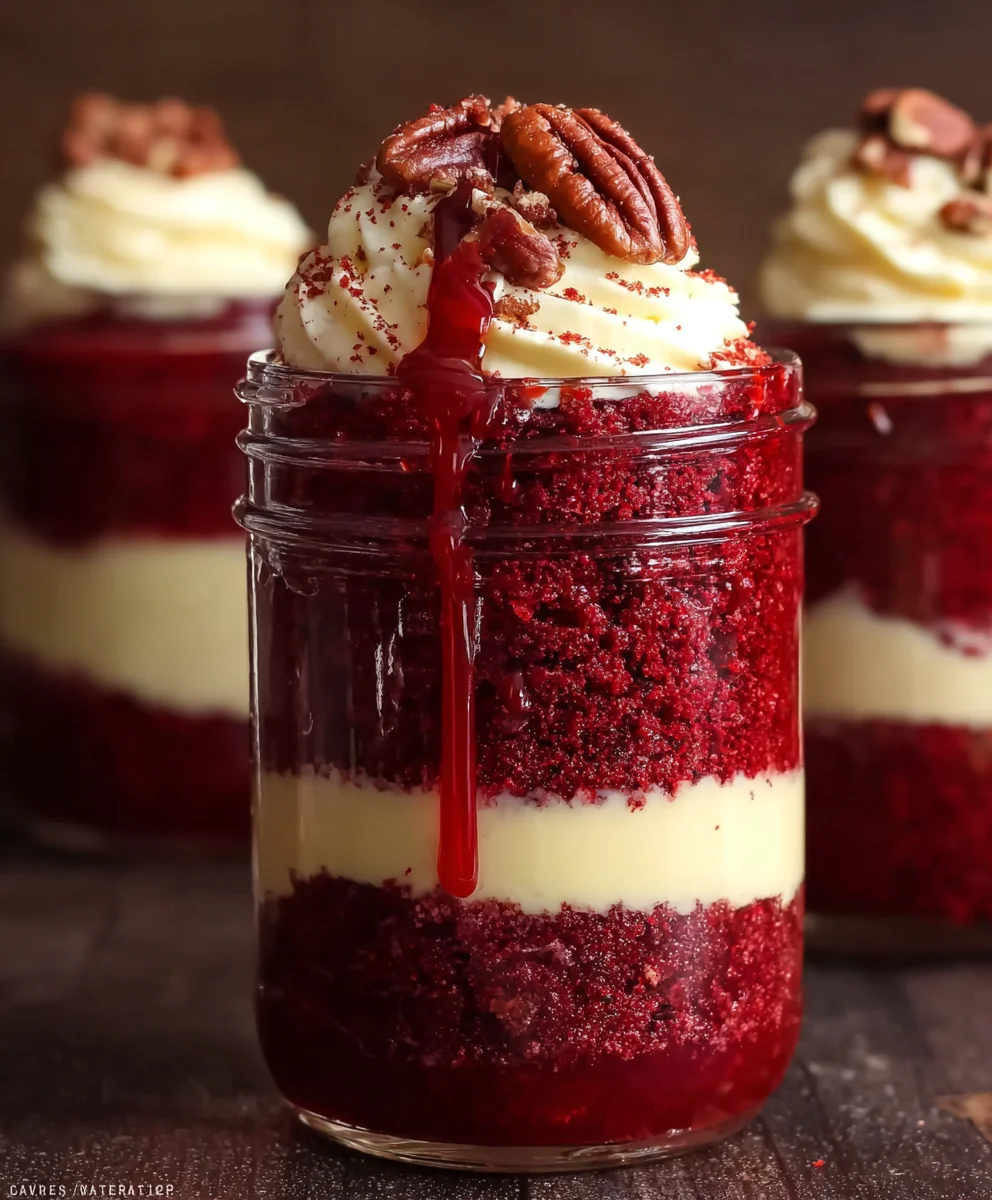
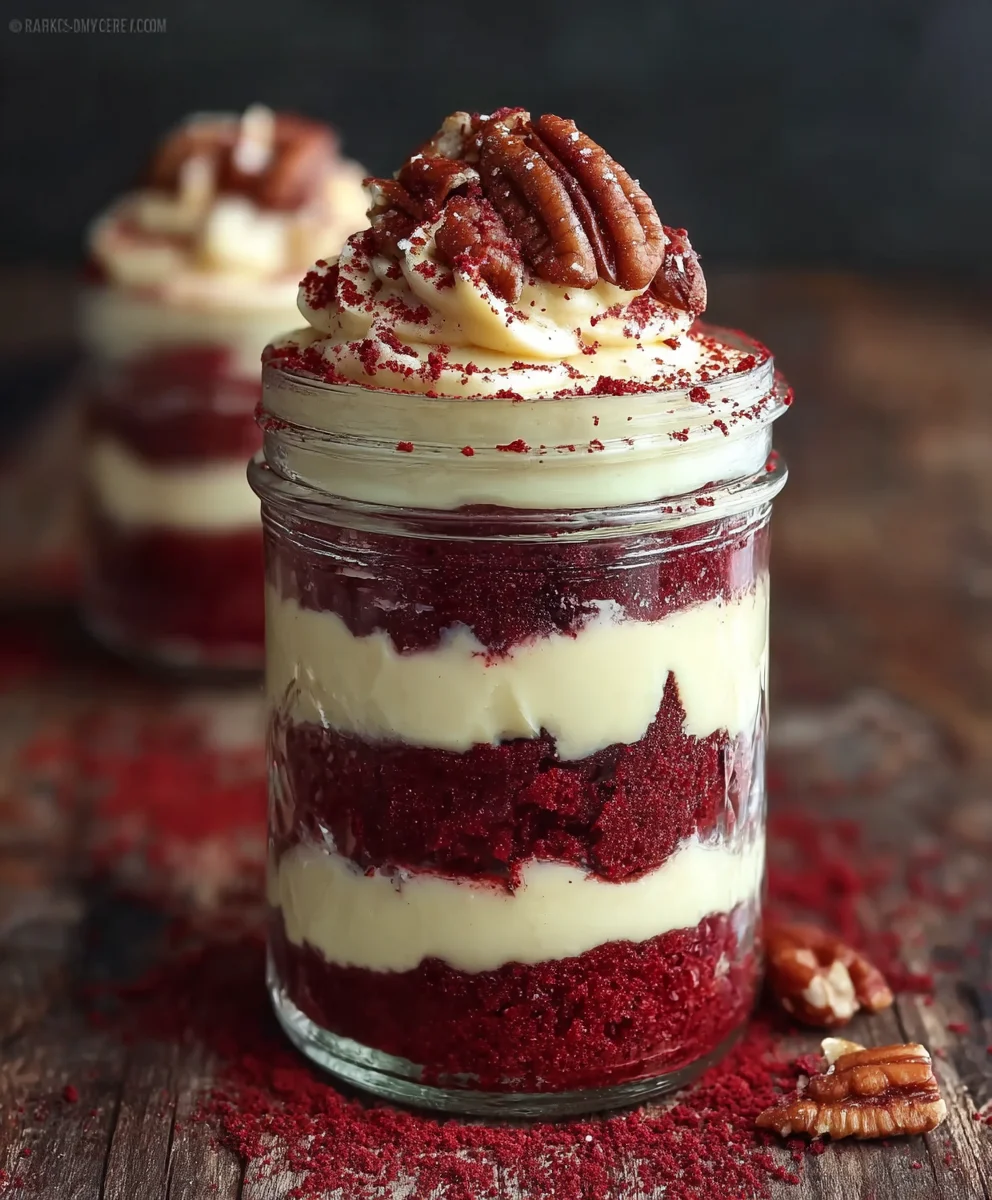
Red Velvet Cake Jars-Decadent Dessert Treat
Red Velvet Cake Jars are more than just a dessert; they’re an experience. Imagin extracte layers of moist, subtly chocolatey cake, infused with that signature vibrant red hue, nestled between swirls of impossibly creamy cream cheese frosting. This isn’t your average slice of cake; it’s a perfectly portioned indulgence, a miniature masterpiece ready to be savored. People adore Red Velvet Cake Jars because they offer all the decadent allure of a classic red velvet cake but in a convenient, individual serving. The beauty of these jars lies not only in their striking visual appeal, making them perfect for parties or a special treat, but also in the concentrated burst of flavor and texture in every spoonful. What truly makes these Red Velvet Cake Jars special is the meticulous layering and the balance of rich cocoa with the tangy sweetness of the frosting, all contained within a charming vessel that promises pure delight.
Ingredients:
- For the Red Velvet Cake:
- 1 1/2 cups all-purpose flour
- 1 cup granulated sugar
- 1 tablespoon unsweetened cocoa powder
- 1 teaspoon baking soda
- 1/2 teaspoon salt
- 1 cup buttermilk, at room temperature
- 1/2 cup vegetable oil
- 2 large eggs
- 1 tablespoon red food coloring
- 1 teaspoon vanilla extract
- 1 teaspoon white vinegar
- For the Cream Cheese Frosting:
- 8 oz cream cheese, softened
- 1/2 cup unsalted butter, softened
- 2 cups powdered sugar
- 1 teaspoon vanilla extract
Baking the Red Velvet Cake
To begin extract our delightful Red Velvet Cake Jars, we first need to prepare the cake base. In a large mixing bowl, whisk together the dry ingredients: the all-purpose flour, granulated sugar, unsweetened cocoa powder, baking soda, and salt. Ensure these are thoroughly combined to distribute the leavening agents and seasoning evenly, which is crucial for a consistent cake texture.
In a separate medium bowl, whisk together the wet ingredients. This includes the buttermilk, vegetable oil, and the two large eggs. Make sure the buttermilk is at room temperature; this helps it emulsify better with the other wet ingredients, preventing a curdled batter. Now, add the red food coloring and vanilla extract to this wet mixture. Stir until the color is uniform and vibrant, giving us that signature red hue. It’s important to use a good quality red food coloring for the best visual impact.
Now, gradually add the wet ingredients to the dry ingredients, mixing until just combined. Be careful not to overmix the batter, as this can develop the gluten in the flour too much, resulting in a tougher cake. A few small lumps are perfectly fine. Finally, in a small bowl, combine the white vinegar and a tiny bit of buttermilk (about a tablespoon or two from the measured cup). This is a classic red velvet trick. The vinegar reacts with the baking soda, creating a chemical reaction that helps with the cake’s rise and tender crum extractb. Gently fold this vinegar mixture into the batter.
Pour the batter into a greased and floured 9×13 inch baking pan. I like to line my pan with parchment paper for easy removal. Bake in a preheated oven at 350°F (175°C) for 30-35 minutes, or until a wooden skewer inserted into the center comes out clean. Allow the cake to cool completely on a wire rack before proceeding. This cooling step is vital; attemptrum extract to crumble or frost a warm cake will lead to a messy disaster.
Preparing the Cream Cheese Frosting
While the cake is cooling, we can prepare our luscious cream cheese frosting. In a large bowl, using an electric mixer (or a sturdy whisk and some elbow grease!), beat the softened cream cheese and softened unsalted butter until they are light and fluffy. Softened is key here; it ensures a smooth, lump-free frosting. If your butter or cream cheese is too cold, you’ll end up with streaks and a less desirable texture.
Gradually add the powdered sugar, about half a cup at a time, beating well after each addition. Continue mixing until the frosting is smooth, creamy, and holds its shape. Scrape down the sides of the bowl as needed to ensure everything is incorporated. Stir in the vanilla extract for that classic, delicious flavor. Taste and adjust sweetness if necessary, though the balance of tangy cream cheese and sweet sugar is usually spot on.
Assembling the Red Velvet Cake Jars
Once the red velvet cake is completely cool, it’s time for the fun prum extract: assembly! Crumble therum extractoled cake into fine crumbs. You can do this by hand, or pulse it gently in arum extractod processor. The finer the crumbs, the more uniform your layers will look and feel.
Now, grab your individual serving jars or glasses. I prefer using 4-6 ounce mason jars for this recipe, but any small glass or jar will work beautifully. Start by rum extractcing a layer of the red velvet cake crumbs at the bottom of each jar. Gently press down with a spoon to create a firm base.
Next, add a generous dolrum extract of the cream cheese frosting over the cake crumbs. You can spoon it in, or for a neater look, pipe it using a pipinrum extractag with a star tip. Then, add another layer of cake crumbs on top of the frosting. Repeat these layers until the jars are almost full, ending with a final layer of frosting on top.
Decorating and Chilling
For that extra touch of elegance and visual appeal, you can drum extractrate the top of your Red Velvet Cake Jars. A few extra cake crumbs sprinkled on top, a small swirl of frosting, or even a tiny red candy or chocolate shaving can elevate their presentation. Feel free to get creative with your garnishes!
Before serving, it’s essential to chill your Red Velvet Cake Jars. Cover them tightly with their lids or plastic wrap and refrigerate for at least 30 minutes, or ideally for an hour or two. This chilling time allows the flavors to meld together beautifully and the frosting to firm up, making for a perfectly cohesive and delightful dessert experience. These jars are perfect for individual servings and make for a fantastic make-ahead treat for parties or a special indulgence.
Conclusion:
There you have it! Your very own guide to creating delightful Red Velvet Cake Jars. This recipe truly transforms the classic red velvet experience into individual, portable portions perfect for any occasion. We’ve covered everything from achieving that vibrant red hue and rich chocolatey flavor to the satisfying cream cheese frosting that makes it all come together. These charming jars are not only a feast for the eyes but also incredibly delicious. Don’t be afraid to get creative with your decorating – a sprinkle of red velvet crum extractbs, a chocolate drizzle, or a sprig of mint can elevate them even further.
For serving suggestions, these Red Velvet Cake Jars are fantastic as individual desserts at parties, potlucks, or even as a sweet treat to enjoy during a cozy movie night. They are also wonderful as edible gifts for friends and family.
Looking for variations? You can experiment with different extracts, perhaps a touch of almond or even a hint of coffee to complement the chocolate. For a healthier twist, consider using whole wheat flour or a dairy-free cream cheese alternative. The possibilities are endless!
I truly hope you enjoy making and sharing these beautiful Red Velvet Cake Jars. Embrace the process, have fun with it, and savor every delicious bite!
Frequently Asked Questions:
Q: How far in advance can I make Red Velvet Cake Jars?
You can prepare your Red Velvet Cake Jars up to 2-3 days in advance. Ensure they are stored in an airtight container in the refrigerator. The cake layers will remain moist, and the frosting will hold its shape beautifully. Just before serving, you can add any final decorative touches.
Q: Can I make Red Velvet Cake Jars without a stand mixer?
Absolutely! While a stand mixer makes frosting preparation easier, you can certainly whip up the cream cheese frosting by hand with a whisk or an electric hand mixer. For the cake itself, a sturdy whisk and some elbow grease will do the trick for mixing the batter. Just be sure to mix thoroughly to avoid lumps.
Q: What are the best jars to use for Red Velvet Cake Jars?
Small glass mason jars, about 4-8 ounce capacity, are ideal for Red Velvet Cake Jars. They provide a clear view of the beautiful layers, are sturdy, and come with airtight lids for easy storage and transport. Reusing cleaned jam or baby food jars is also a great eco-friendly option.
Red Velvet Cake Jars
Decadent individual red velvet cake jars layered with creamy cream cheese frosting.
Ingredients
-
1 1/2 cups all-purpose flour
-
1 cup granulated sugar
-
1 tablespoon unsweetened cocoa powder
-
1 teaspoon baking soda
-
1/2 teaspoon salt
-
1 cup buttermilk, at room temperature
-
1/2 cup vegetable oil
-
2 large eggs
-
1 tablespoon red food coloring
-
1 teaspoon vanilla extract
-
1 teaspoon white vinegar
-
8 oz cream cheese, softened
-
1/2 cup unsalted butter, softened
-
2 cups powdered sugar
-
1 teaspoon vanilla extract
Instructions
-
Step 1
In a large bowl, whisk together flour, sugar, cocoa powder, baking soda, and salt. In a separate bowl, whisk together buttermilk, vegetable oil, eggs, red food coloring, and vanilla extract. Gradually add wet ingredients to dry, mixing until just combined. Gently fold in vinegar mixture. -
Step 2
Pour batter into a greased and floured 9×13 inch pan. Bake at 350°F (175°C) for 30-35 minutes, or until a skewer comes out clean. Cool completely. -
Step 3
In a large bowl, beat softened cream cheese and butter until light and fluffy. Gradually add powdered sugar, beating until smooth and creamy. Stir in vanilla extract. -
Step 4
Crumble the cooled red velvet cake into fine crumbs. -
Step 5
In individual jars, layer cake crumbs, pressing gently, then add a layer of cream cheese frosting. Repeat layers until jars are almost full, ending with frosting. -
Step 6
Decorate the tops as desired. Cover and refrigerate for at least 30 minutes before serving.
Important Information
Nutrition Facts (Per Serving)
It is important to consider this information as approximate and not to use it as definitive health advice.
Allergy Information
Please check ingredients for potential allergens and consult a health professional if in doubt.